English Version
Im Urwald zu wohnen erfordert sicher eine besondere Art von Improvisationsfähigkeiten. Dazu braucht „Mann“ einfach eine Werkstatt. Eine Mauerruine auf dem Gelände soll dazu umgebaut und nutzbar gemacht werden.
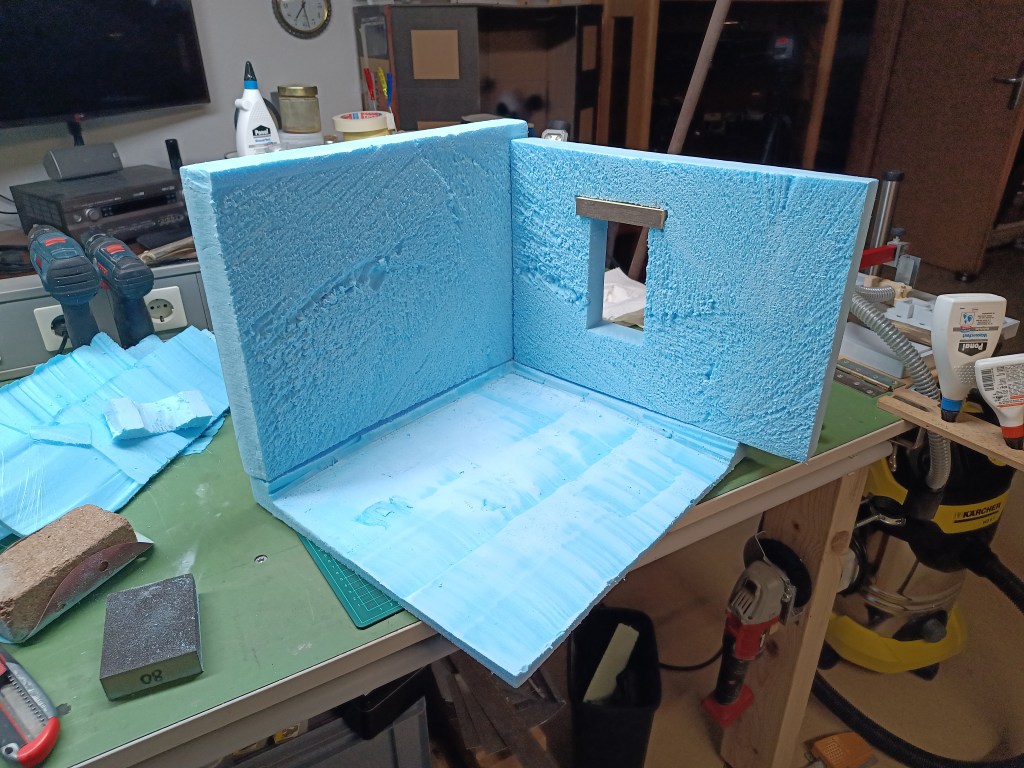
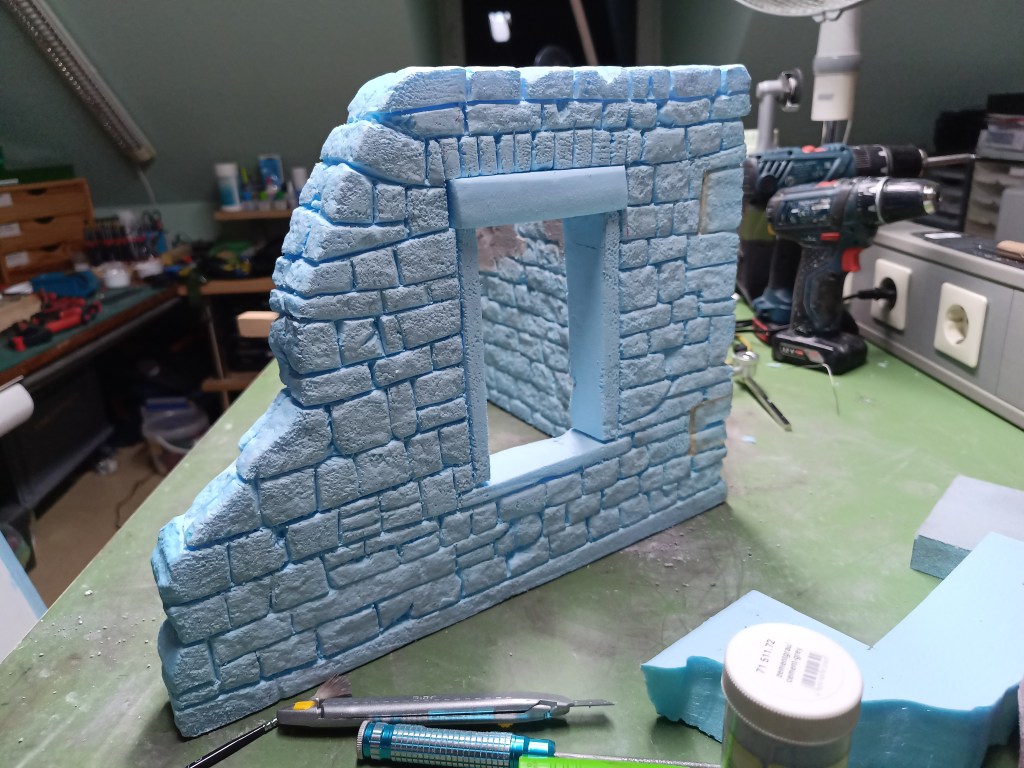
Dämmplatten aus Styrodur wurden dazu von mir längs durchgesägt.
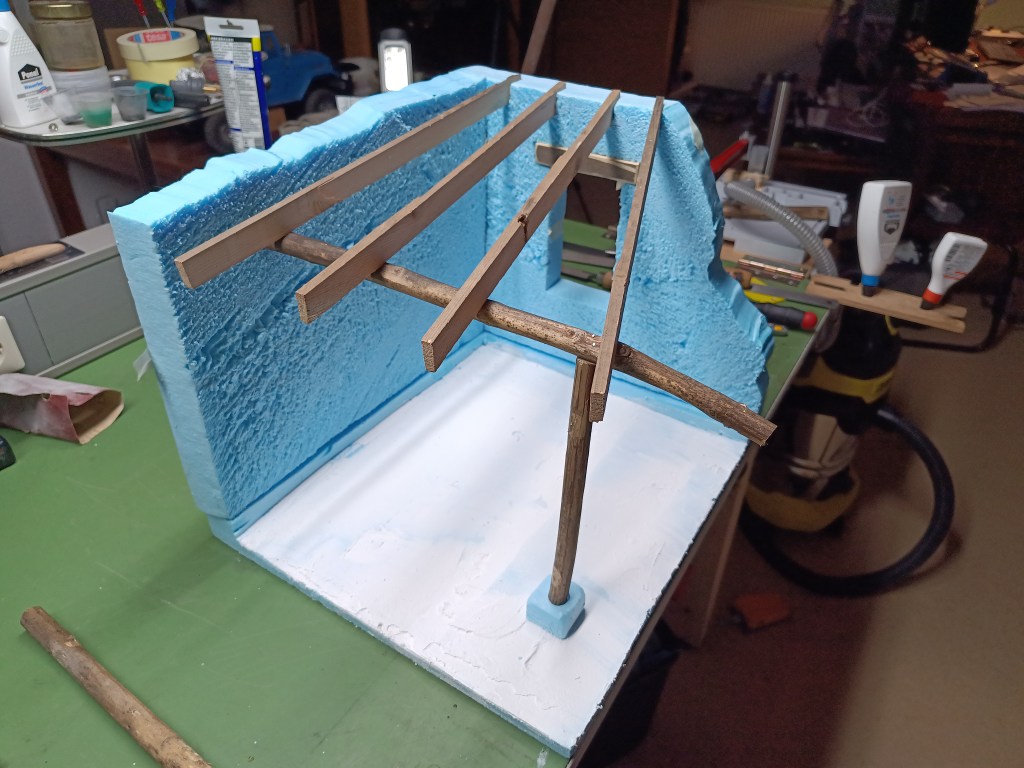
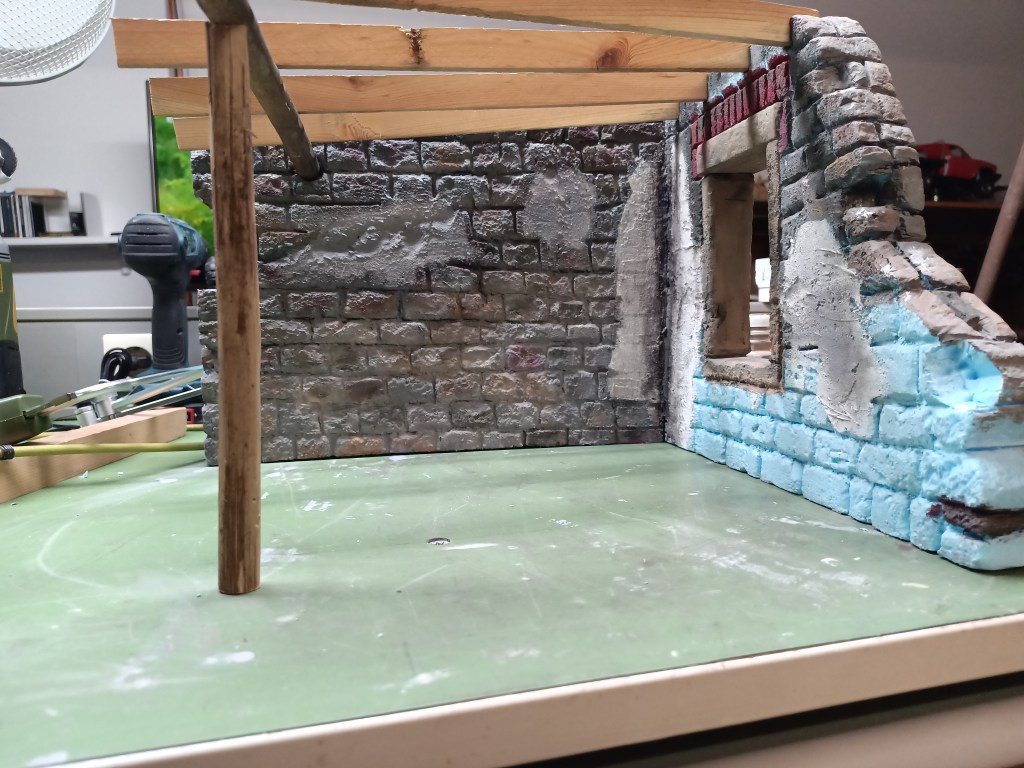
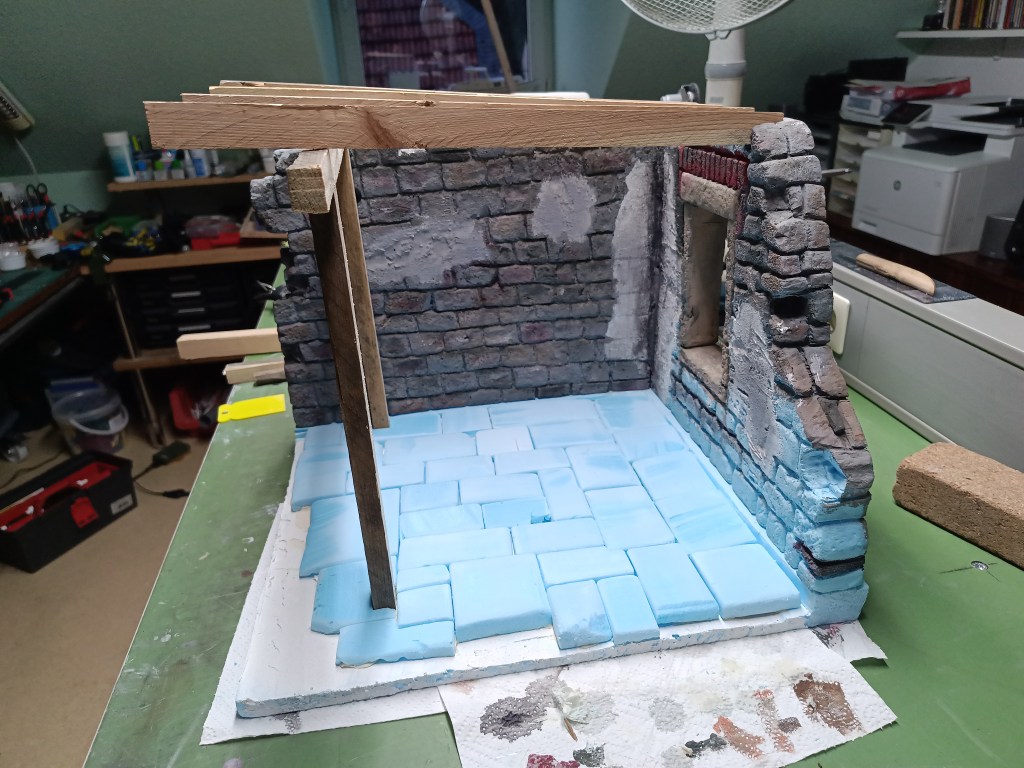
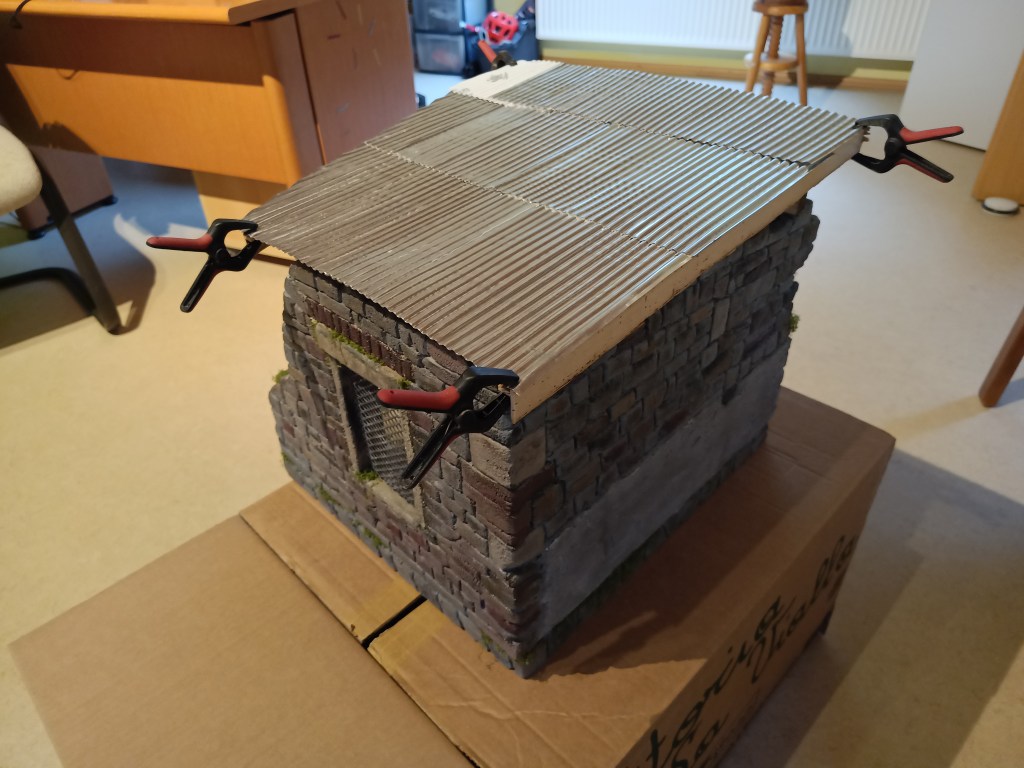
Um im Trocknen arbeiten zu können, gab es auch ein Dach. Hier noch die erste Version, mit nach vorne abfallendem Aufbau. Im Verlauf werde ich das noch ändern, um den Einblick in die Werkstatt nicht unnötig zu beschränken.
Die von der Säge verursachten Schäden, entlang der Sägefläche, habe ich kurzerhand mit einer Putzschicht optisch kaschiert. Auf den restlichen Flächen wurden wieder mit einer Rundfeile die Bruchsteinstruktur eingeprägt. Vor dem ersten Farbauftrag wurde die gesamte Oberfläche mit einer Mischung aus Leim und Wasser, im Verhältnis 1:1, eingestrichen. Das härtet die weiche Struktur etwas. Kleine überstehende Reste der Dämmung sind so auch einfacher zu entfernen. So schön das Ergebnis auch aussieht, es bedarf vieler einzelner Schritte, um ein möglichst realistisches Ergebnis zu bekommen. Glaubt man alles gefunden und fertig zu sein, tauchen immer wieder kleine Makel auf.
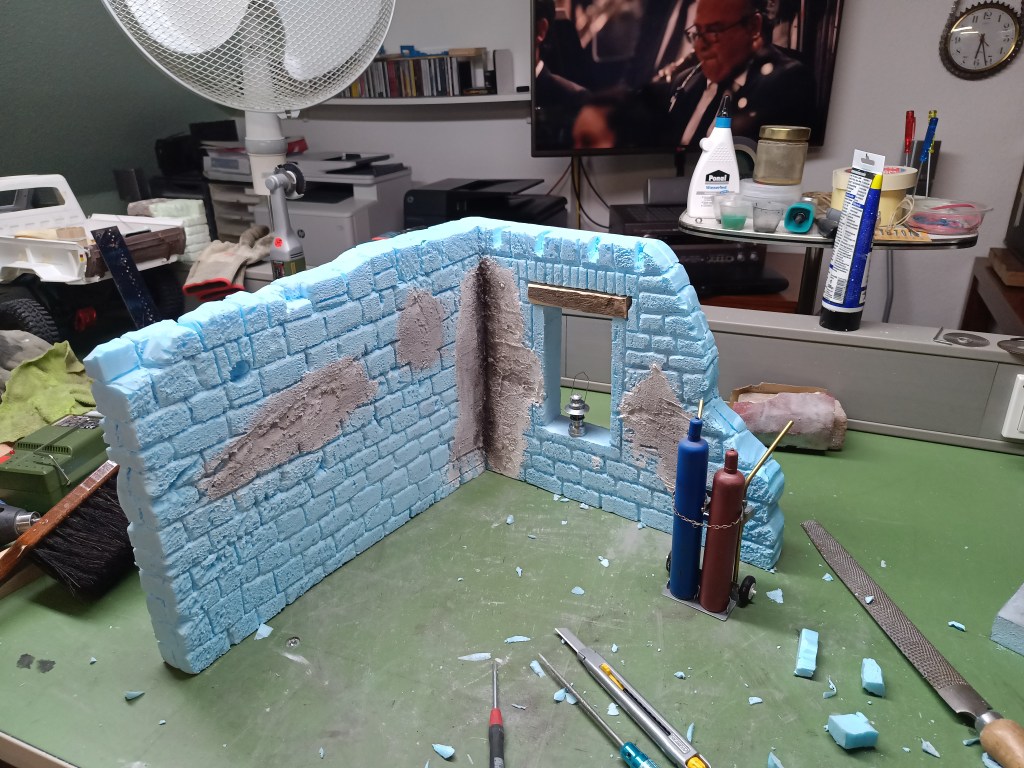
Die Außenseiten des Gebäudes sind auch gleichzeitig die Außenseiten der Dämmplatten. Sie sind deutlich härter als das Kernmaterial. Beim Einprägen musste diese harte Oberfläche tief eingedrückt werden, um eine bleibende Struktur zu behalten. Dadurch reißt das Material ein und bildete ausgefranste, unschöne Ränder. Daher habe ich hier kurzentschlossen alle Fugen mit dem Skalpell eingeschnitten und so plastischer nachgeformt. Das Ergebnis war die Mühen wert. Einen Teil der Rückwand habe ich dennoch verputzt. Irgendwann hatte ich nämlich keine Kraft mehr in den Händen und die Konzentration war auch nur noch bedingt vorhanden.
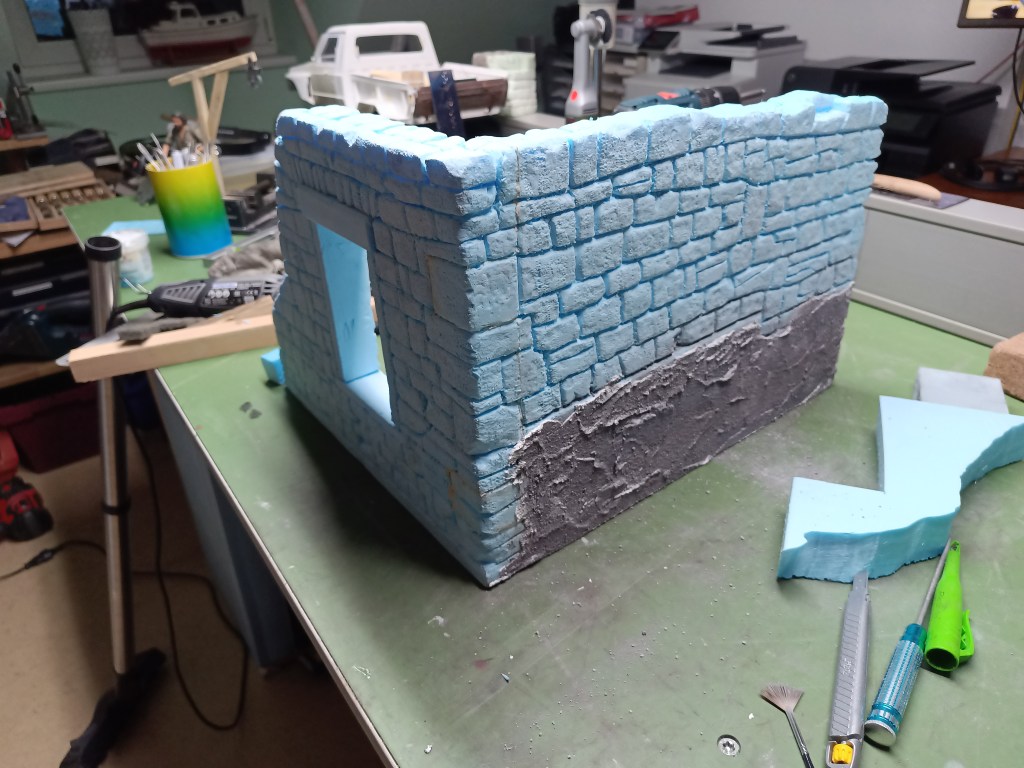
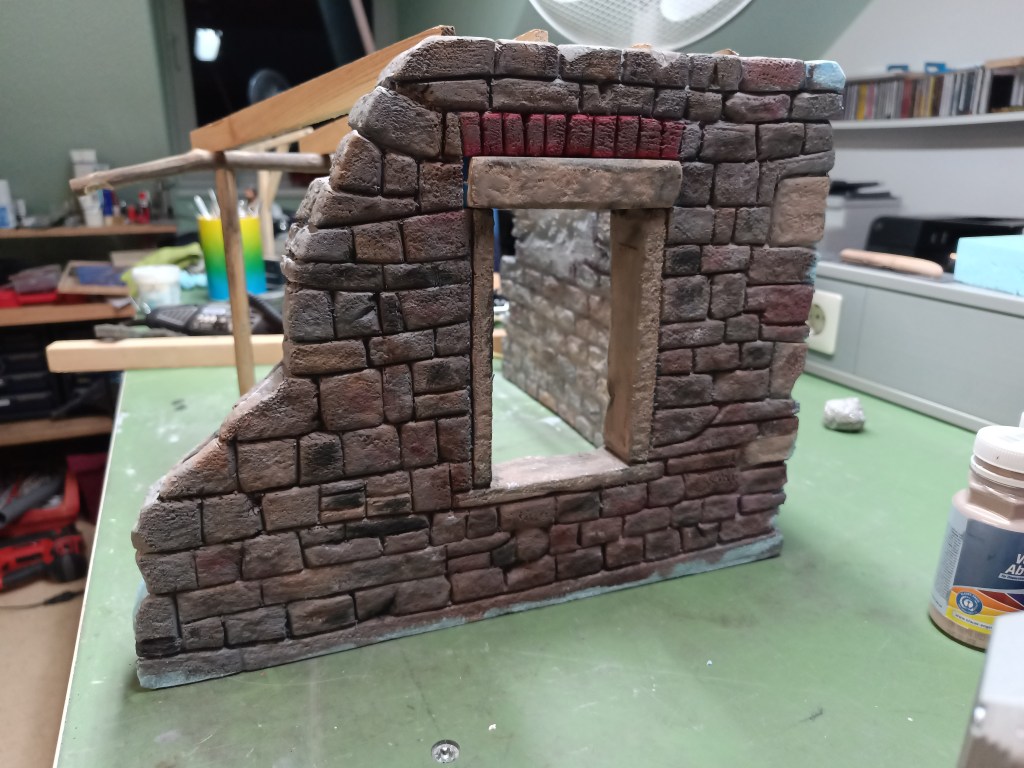
Nachfolgend ein Vorher und Nachher-Bild. Der obere Sandsteinsturz wurde einzeln gebaut und in den ausgesparten Bereich eingesetzt. Alles andere ist aus dem vollen Dämmmaterial gearbeitet. Mit einer aus Aluminiumfolie geknüllten Kugel, wurde wieder final eine steinartige, ungleichmäßige Oberfläche geschaffen.
Der überdachte Bereich, immer noch mit der alten, nach vorne abfallenden Dachschräge, wurde auch Schritt für Schritt bemalt. Auch habe ich hier noch einige Steinausbrüche hinzugefügt, um den Ruinencharakter hervorzuheben.
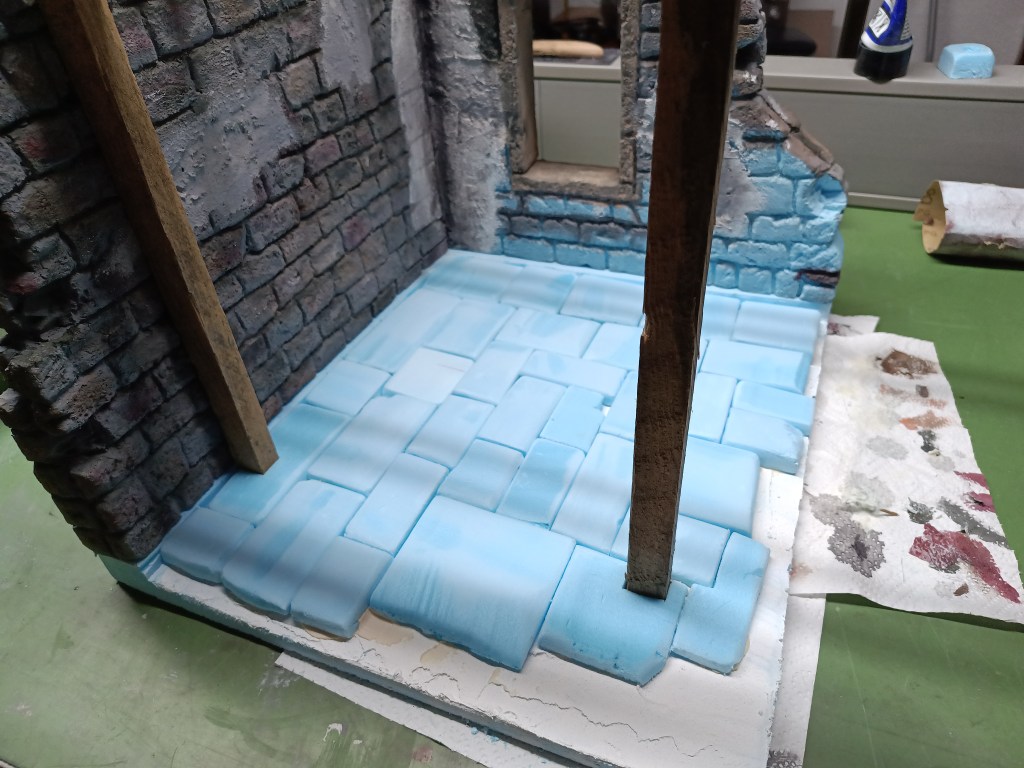
Aus Resten des Styrodur-Verschnittes wurden Steinplatten für den Werkstattboden angefertigt und mit Montagekleber befestigt.
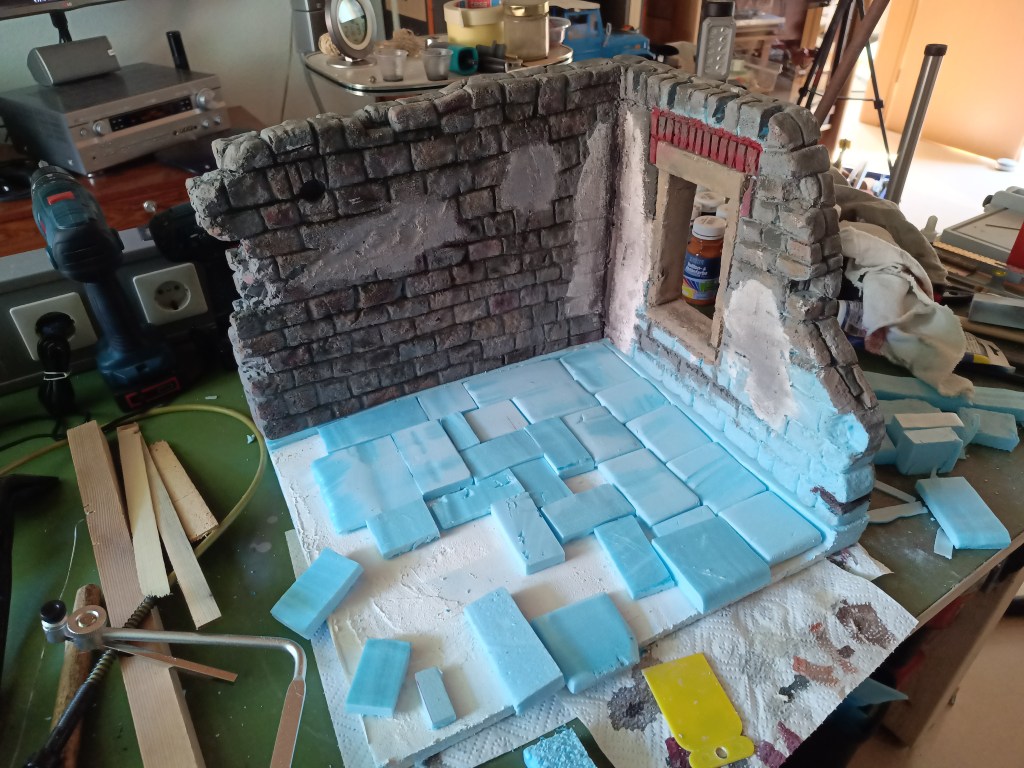
Hier fertig verlegt.
Und hier nun das angekündigte, vorne ansteigende Flachdach.
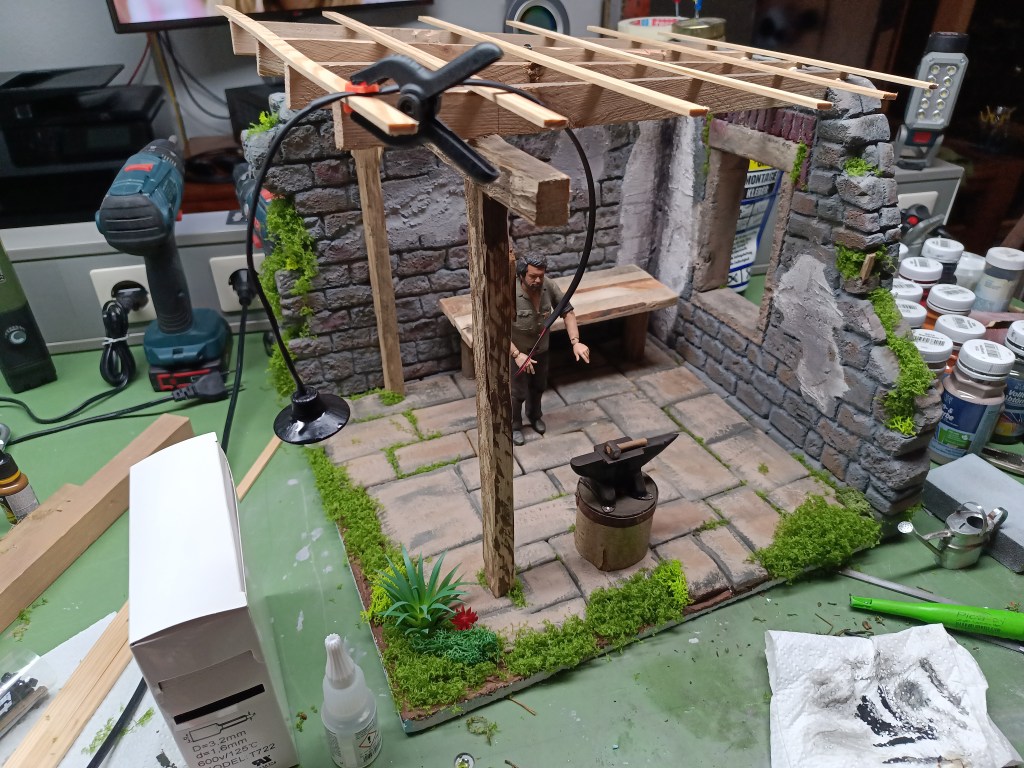
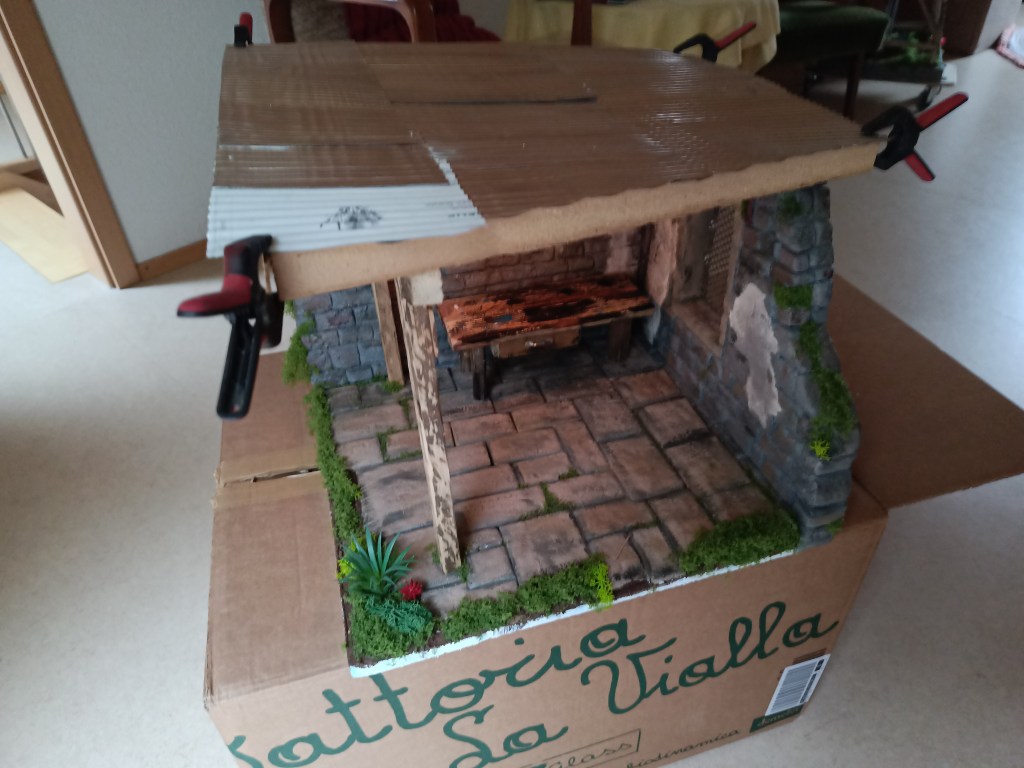
Nach einigen Tagen Arbeit hat sich auch diese Bild verändert. Eine Werkbank und weiteres Equipment ist entstanden, oder gerade im Bau.
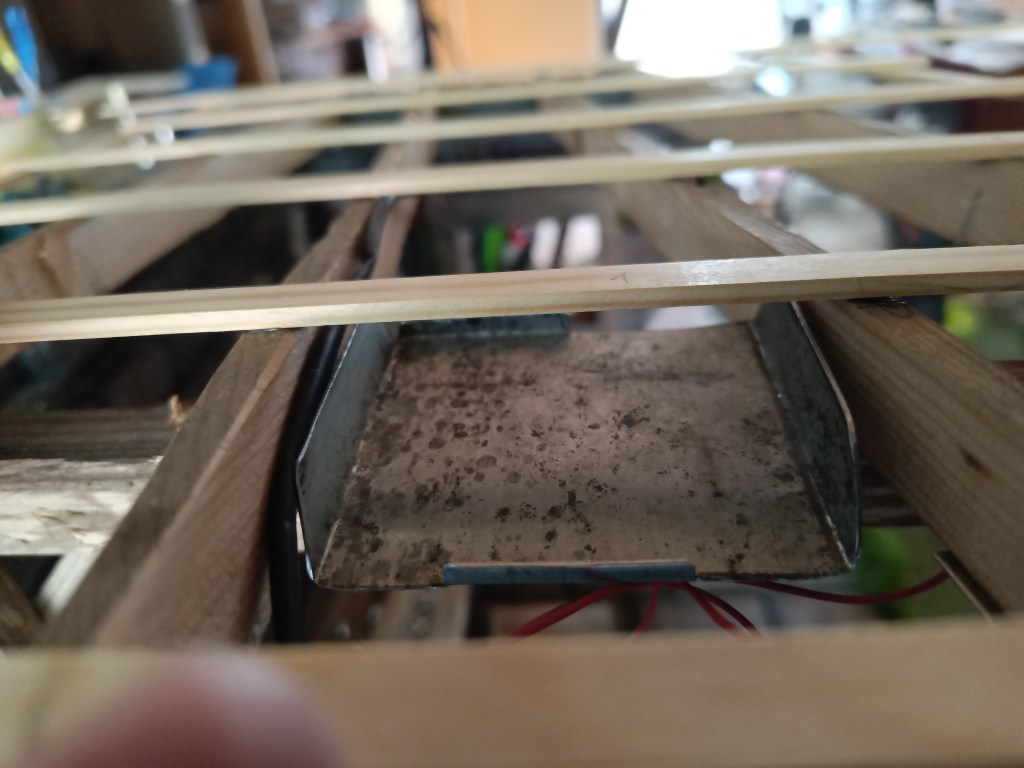
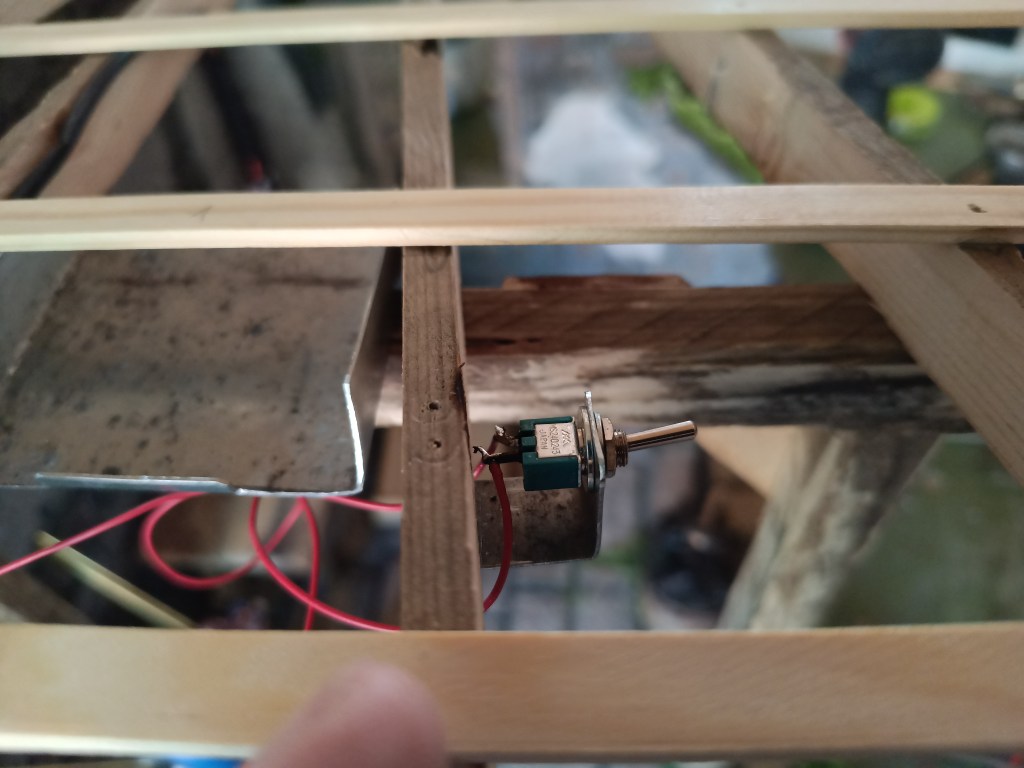
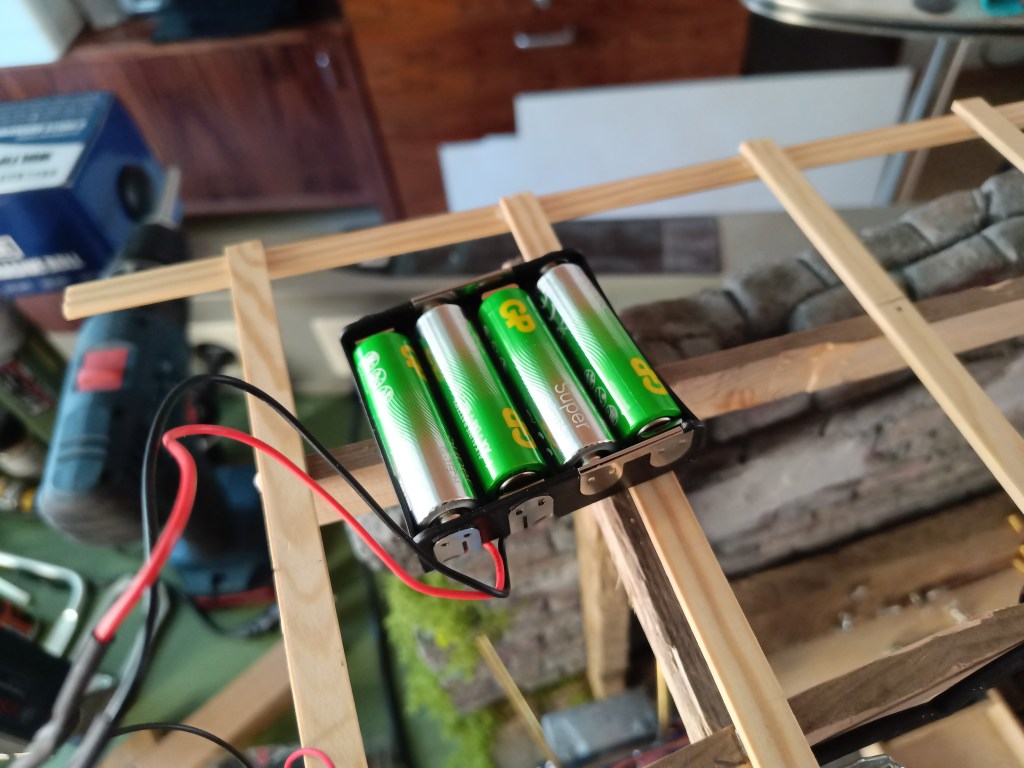
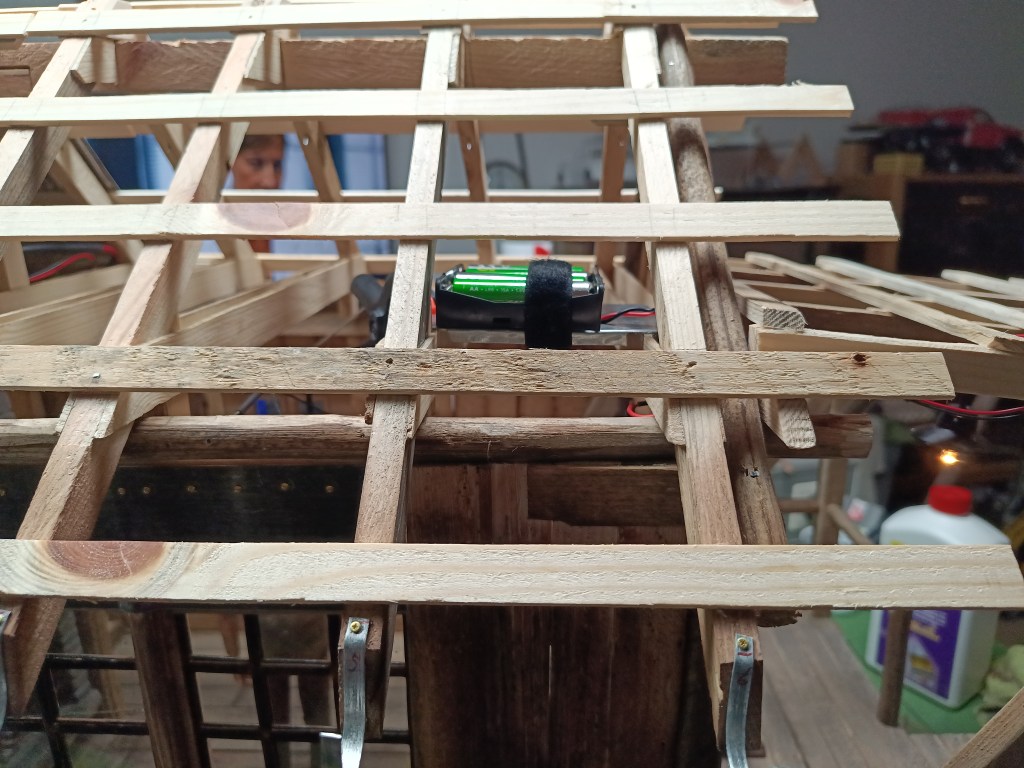
Links; Für die Beleuchtung wurde aus Zinkblech eine Schale gekantet und am Dachbalken verschraubt. Mitte; Ein Kippschalter schaltet die Leuchte. Vier Batterien in einer Box liefern die Energie.
Das Ergebnis ergibt schönes warmes Licht.
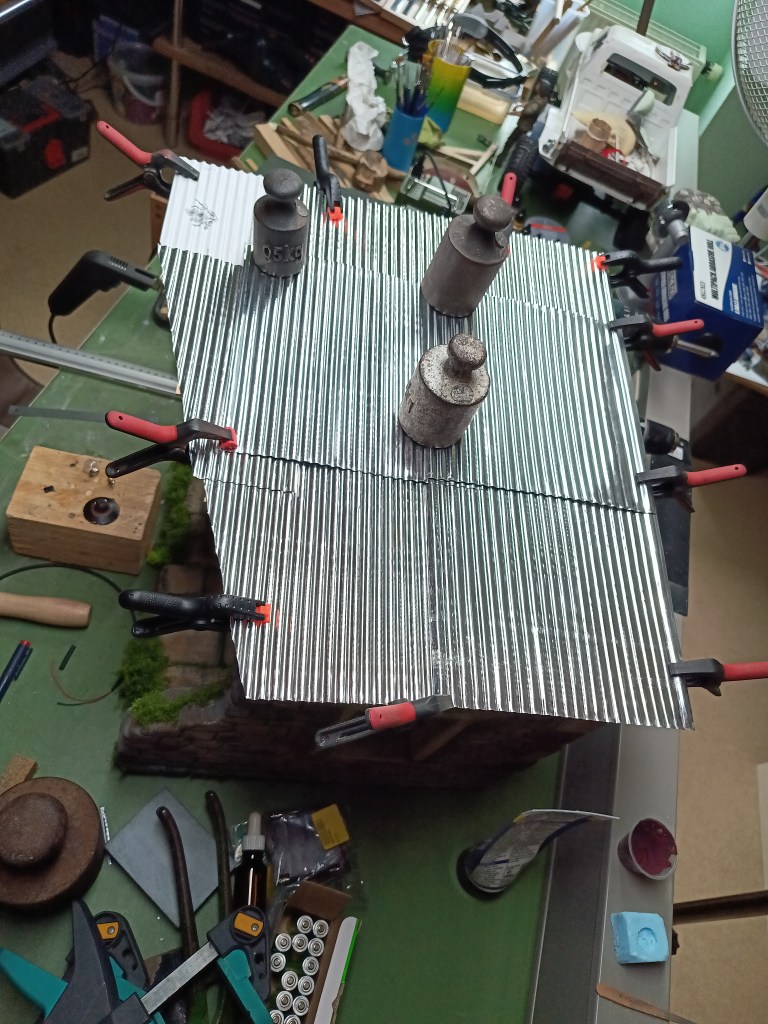
Die Wellblechplatten wurden wieder auf meiner selbstgebauten Matrize geformt und im ersten Schritt nur lose aufgelegt.
Auf dem Tisch wurden alle Stöße, Platte für Platte, mit Maler-Acryl verklebt und somit gleichzeitig abgedichtet. Vor der Lackierung und Alterung der Dachfläche sieht es jetzt so aus.
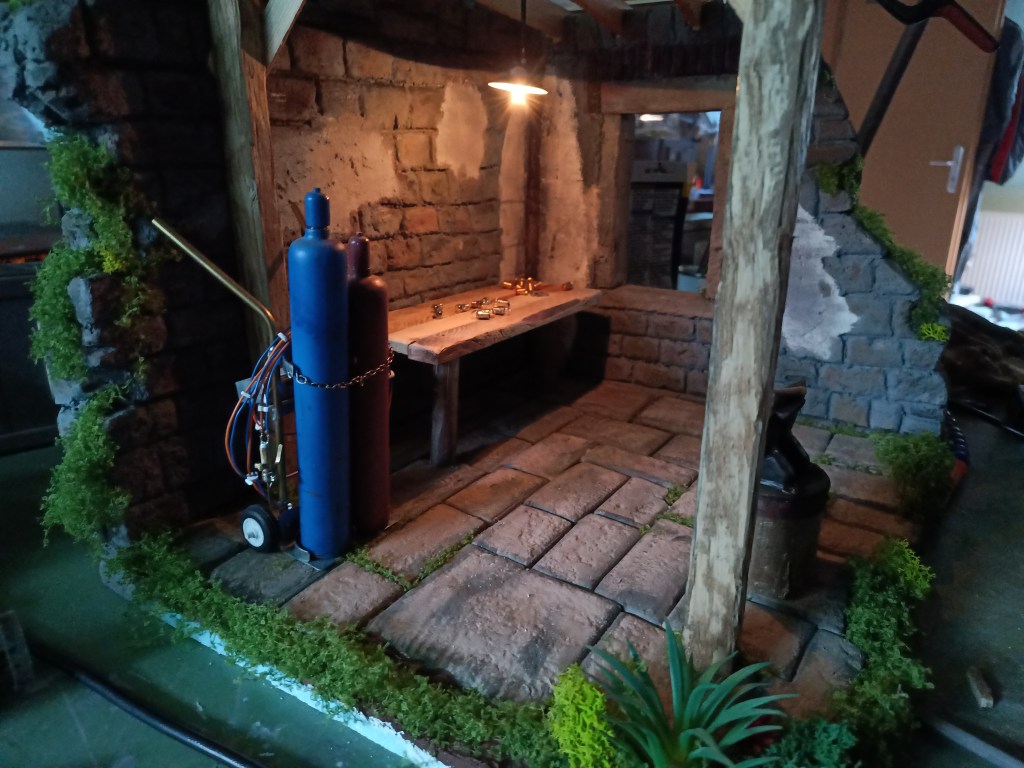
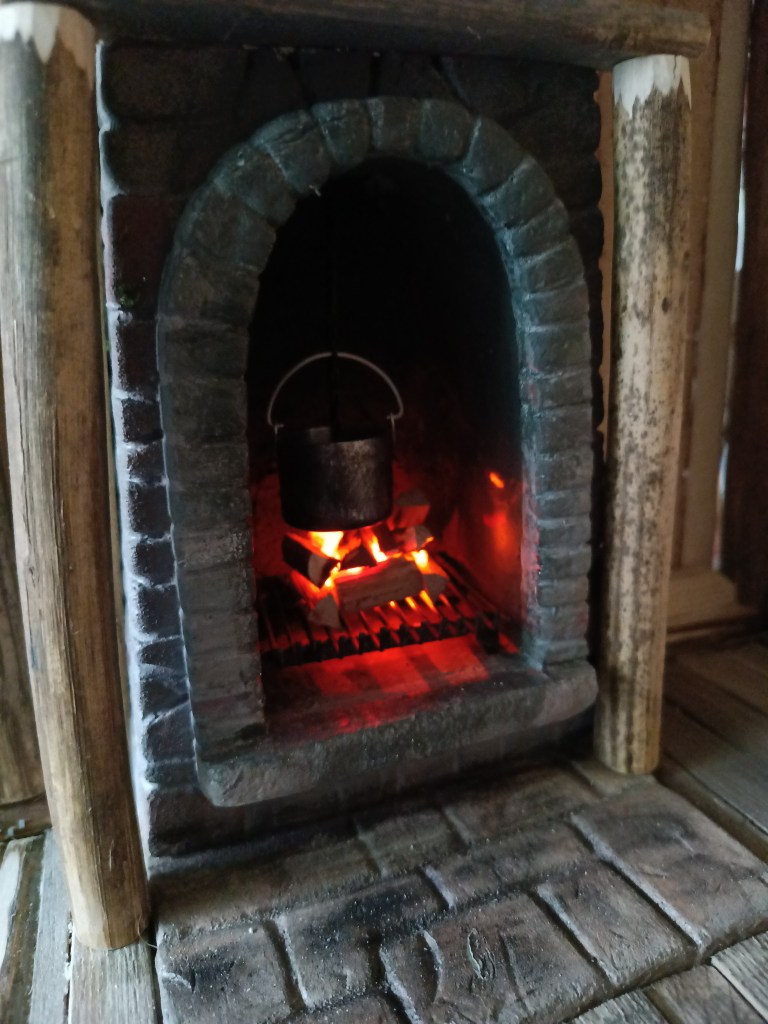
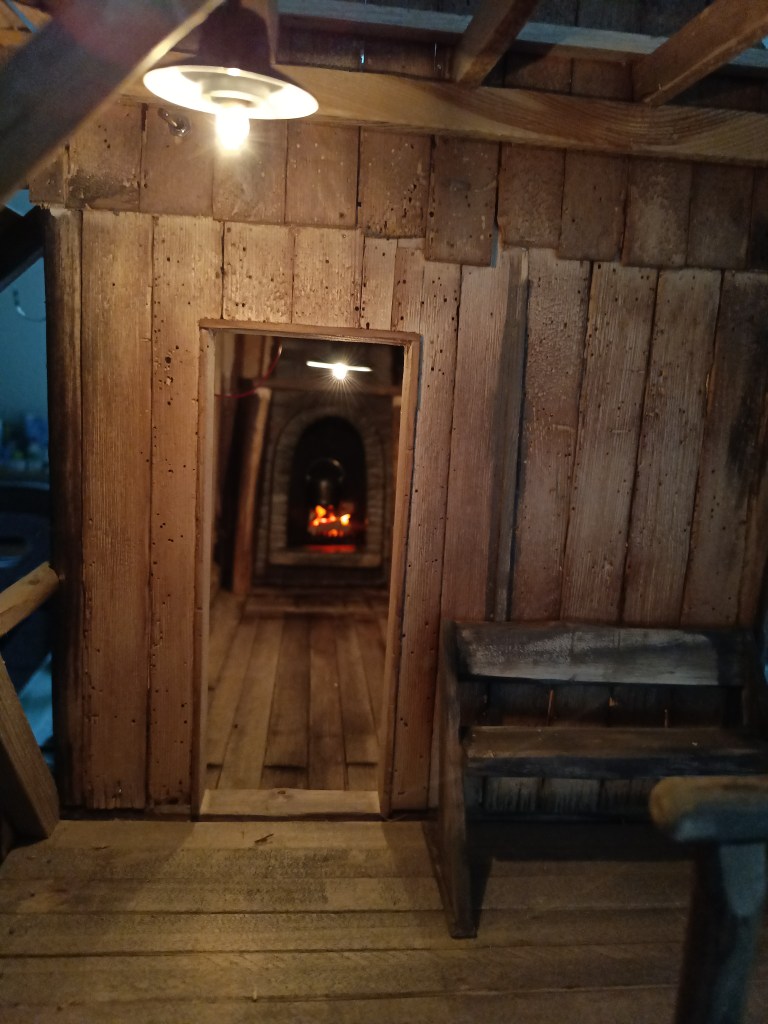
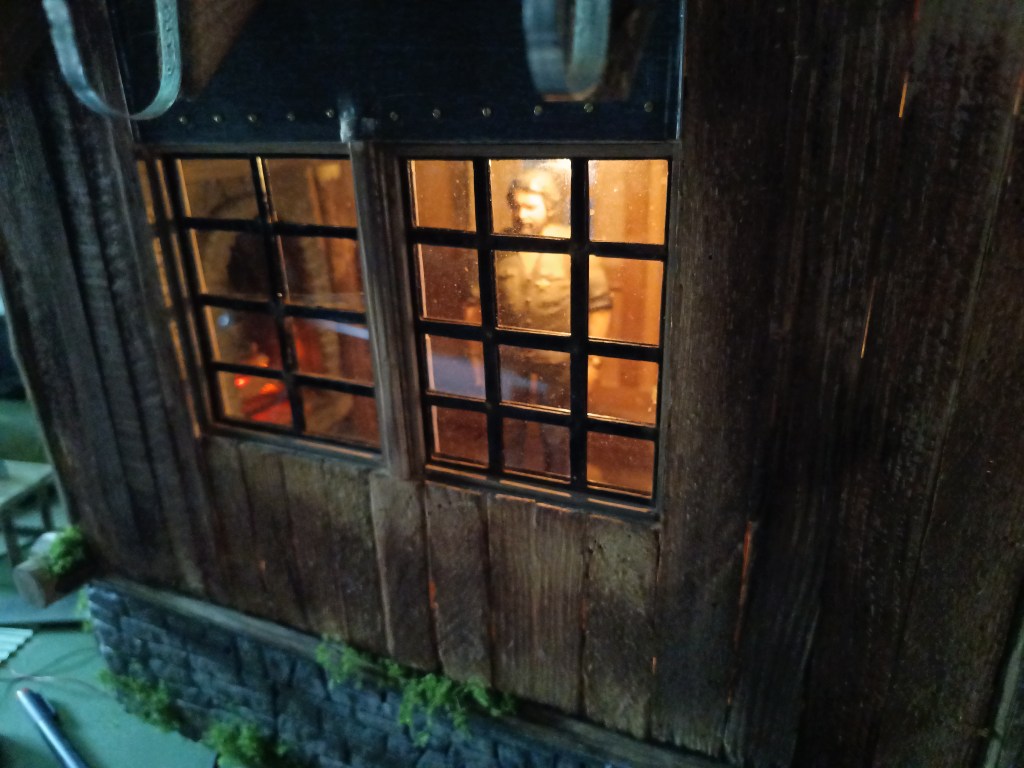
Im Innenraum und auf der Veranda gibt es jetzt auch Licht. Der Kamin wurde ebenfalls fertiggestellt. Drei Flacker-LED, rot und gelb und etwas aufgeschichtetes Holz gaukeln eine gemütliche Feuerstelle vor.
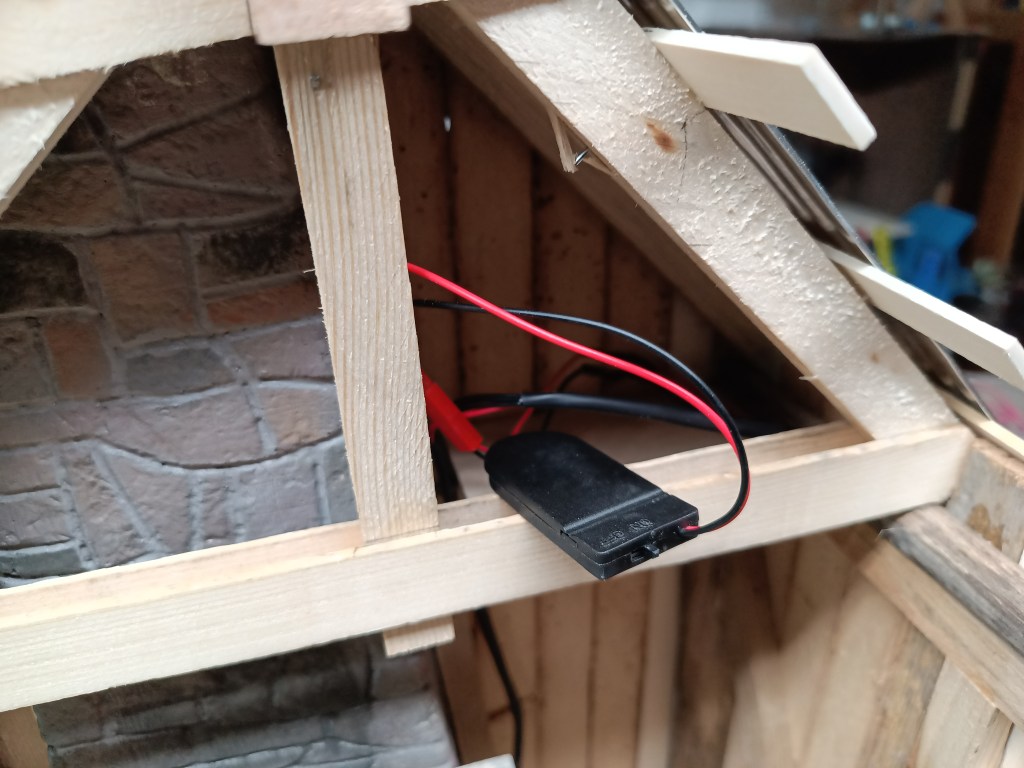
Die Stromversorgung dafür ist jeweils getrennt schaltbar. Einmal links nur die Kochstelle mit zwei 1,5Volt-Knopfzellen und rechts ein Batteriefach mit vier 1,5 V-Batterien für die beiden Hängelampen.
Zur endgültigen Fertigstellung fehlt jetzt nur noch die Verklebung der Wellplatten auf dem Haus, deren farbliche Gestaltung, bzw. Alterung, die Befestigung der Regenrinnen und des Pultdaches auf der Veranda. Die Dachteile sind bereits verklebt und warten auf das Finale. Langsam fällt mir ein Stein vom Herz. Die Übergabe an das Organisationsteam steht unmittelbar bevor. 😅
Wird schnellstmöglich fortgesetzt…
English Version
The workshop takes shape in a ruin
Living in the jungle certainly requires a special kind of improvisational skill. For that, you simply need a workshop. A ruined wall on the property is to be converted and made usable for this purpose.
I sawed Styrodur insulation boards lengthwise for this.
To be able to work in the dry, I also added a roof. Here is the first version, with a structure sloping downward at the front. I’ll change this later on so as not to unnecessarily restrict the view into the workshop.
I quickly concealed the damage caused by the saw along the cut surface with a layer of plaster. On the remaining surfaces, I used a round file to re-create the rough-hewn stone texture. Before applying the first coat of paint, the entire surface was coated with a mixture of glue and water in a 1:1 ratio. This hardens the soft texture slightly. Small protruding bits of insulation are also easier to remove this way. As beautiful as the result looks, it takes many individual steps to achieve the most realistic result possible. Just when you think you’ve found everything and are finished, small imperfections keep cropping up.
The outer surfaces of the building are also the outer surfaces of the insulation panels. They are significantly harder than the core material. When embossing, this hard surface had to be pressed in deeply to retain a lasting texture. As a result, the material tore, forming frayed, unsightly edges. So I decided on the spot to cut into all the joints with a scalpel and reshape them to give them more definition. The result was worth the effort. I did, however, plaster part of the back wall. At some point, I simply had no strength left in my hands, and my concentration was also waning.
Below is a before-and-after photo. The upper sandstone collapse was built separately and inserted into the recessed area. Everything else was carved out of the solid insulation material. Using a ball crumpled from aluminum foil, I finally created a stone-like, uneven surface.
The covered area, still featuring the old, forward-sloping roof pitch, was also painted step by step. I also added a few chipped stones here to emphasize the ruined look.
Stone slabs for the workshop floor were made from scraps of Styrodur and attached with construction adhesive.
Here, they are fully installed.
And here is the previously mentioned flat roof that slopes upward at the front.
After a few days of work, this scene has changed as well. A workbench and other equipment have been built—or are currently under construction.
Left: For the lighting, a bowl was formed from sheet zinc and screwed onto the roof beam. Center: A toggle switch turns the light on and off. Four batteries in a box provide the power.
The result is a beautiful, warm light.
The corrugated metal sheets were once again formed on my homemade die and, in the first step, were simply laid loosely in place.
On the table, all seams were glued together, sheet by sheet, using painter’s acrylic, thereby sealing them at the same time. This is what it looks like now, before painting and weathering the roof surface.
There is now lighting inside and on the porch as well. The fireplace has also been completed. Three flickering LEDs—red and yellow—and some stacked wood create the illusion of a cozy fire pit.
The power supply for each can be switched on and off separately. On the left, just the cooking area with two 1.5-volt button cells, and on the right, a battery compartment with four 1.5-volt batteries for the two hanging lamps.
All that’s left to finish it off is to glue the corrugated sheets onto the house—including their color scheme and weathering—and to attach the rain gutters and the pent roof on the porch. The roof sections are already glued in place and waiting for the final touches. I’m slowly starting to breathe a sigh of relief. The handover to the organizing team is just around the corner. 😅
Will be continued as soon as possible…
Translation, with the kind support of deepl.com
