English Version
Jährlich findet hier in Deutschland der sogenannte SuperScale statt. Eine Veranstaltung für RC-Freunde, um möglichst realistisch gestaltete RC-Fahrzeuge in ebensolcher Umgebung zu bewegen. Hier verschwimmt dann endgültig der Unterscheid zwischen realen Fahrzeugen und ihren ferngesteuerten Gegenstücken.
Für die Veranstaltung im Jahr 2026 wurde im RockCrawler-Forum zu einen Bauwettbewerb aufgerufen; Thema Amazonas. Ich selbst war noch nie bei dieser Veranstaltung, konnte aber eine Anfrage zur Wettbewerbsteilnahme nicht ausschlagen. Die teilnehmenden Modelle werden danach Bestandteil der SuperScale-Organisation und werden zukünftige Veranstaltungen bereichern. Im Vorfeld jeder Veranstaltung hat diese ehrenamtliche Organisation eine Menge Arbeit und opfert dafür Freizeit. Ich fand den Gedanken schön, einen kleinen Teil dazu beizutragen.
Auf einer Fläche von 60×60 cm kann ein Amazonas-typisches Teil gebaut werden. Häuser, Boote, Flöße und was einem sonst noch in den Sinn kommt. Mein Wettbewerbsbeitrag ist eine Holzhütte aus Stämmen und Brettern mit Wellblechbedachung. Das Gebäude werde ich in Kürze auch vorstellen, wenn ich damit begonnen habe. Im Moment sammele ich Holzstämmchen und Ideen.
Nun zum Thema. Das Gebäude wird zum Standort des Rat Comanche. In und um das Gebäude soll das Leben dargestellt werden. Improvisation und die Weiternutzung gebrauchter Teile sollen dabei im Vordergrund stehen. Heute baue ich dafür eine Schweißmöglichkeit mit je einer Gas- und Acetylen-Flasche. Die Armaturen stelle ich in den folgenden Beiträgen vor.
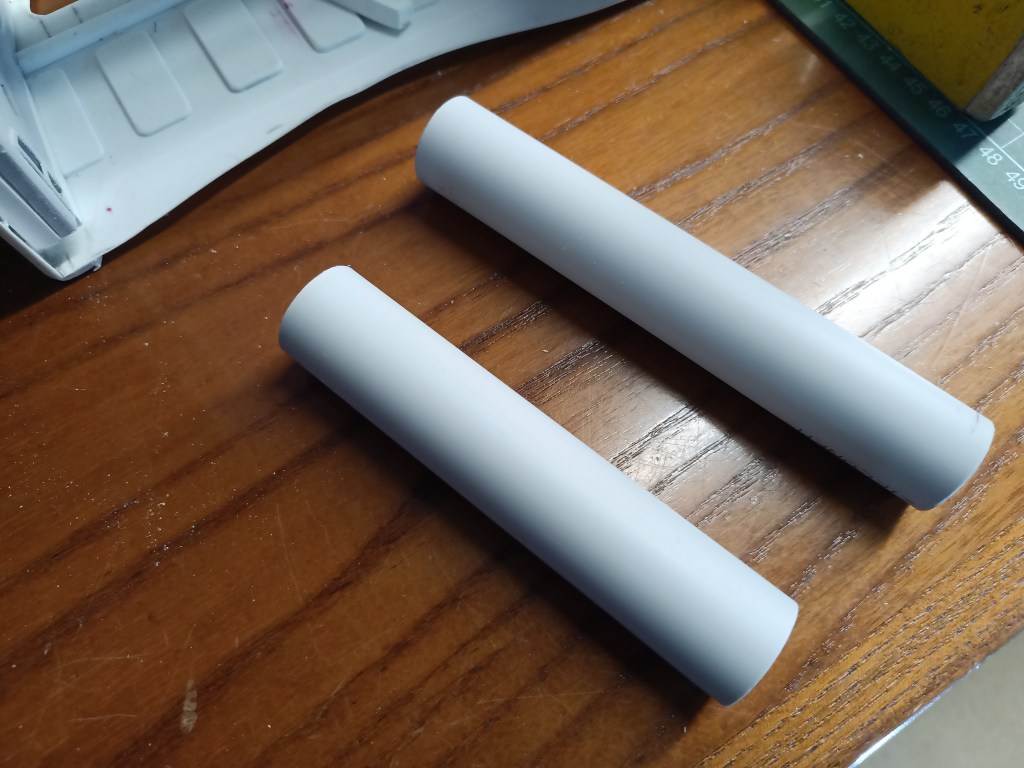
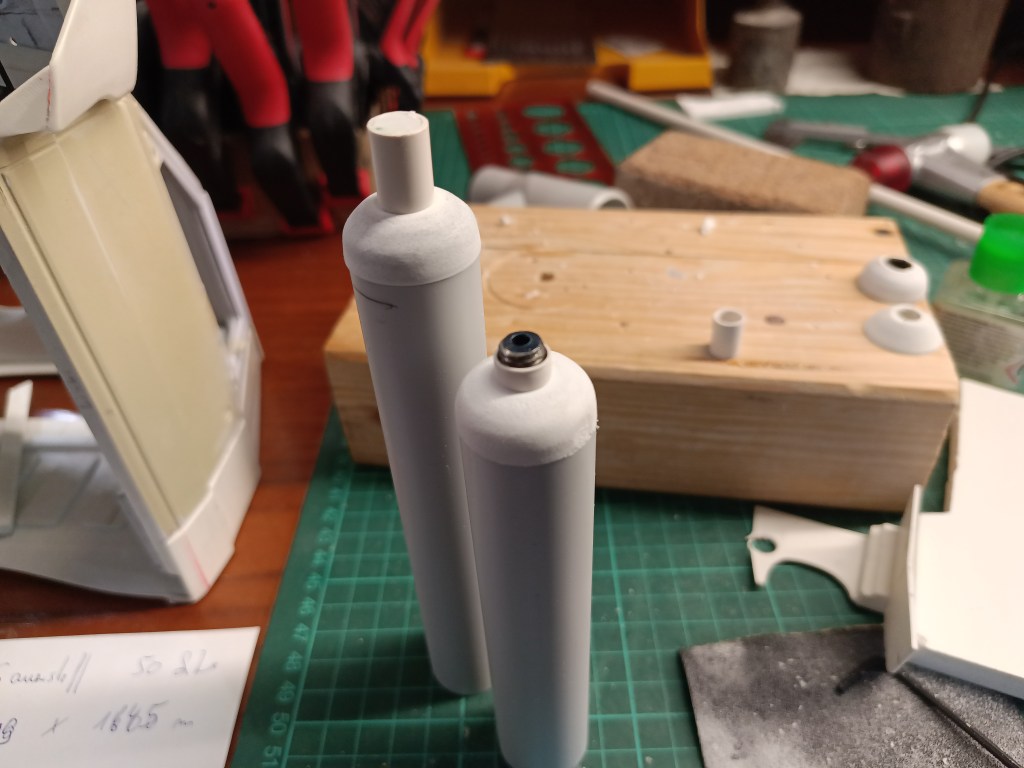
Brenngase und Sauerstoff gibt es in verschiedenen Größen und Inhalten. Hier gibt es zwei 50 Liter fassende Flaschen. Die größte überhaupt in Flaschen verfügbare Menge zum autogenen Schmelzschweißen. Die Original Maße für Sauerstoff, 229 mm Durchmesser bei 1645 mm Höhe. Acetylen 230 mm und 1460 mm. Die Wettbewerbsmodelle sollen im Maßstab 1:10 gebaut werden. Aus Gründen der Einfachheit und Verfügbarkeit habe ich fertige Kunststoffrohre 24 mm für den Flaschenkörper verwendet, etwas größer als gefordert. Es dient normalerweise als Schutzrohr bei Aufputz-Kabelverlegungen.
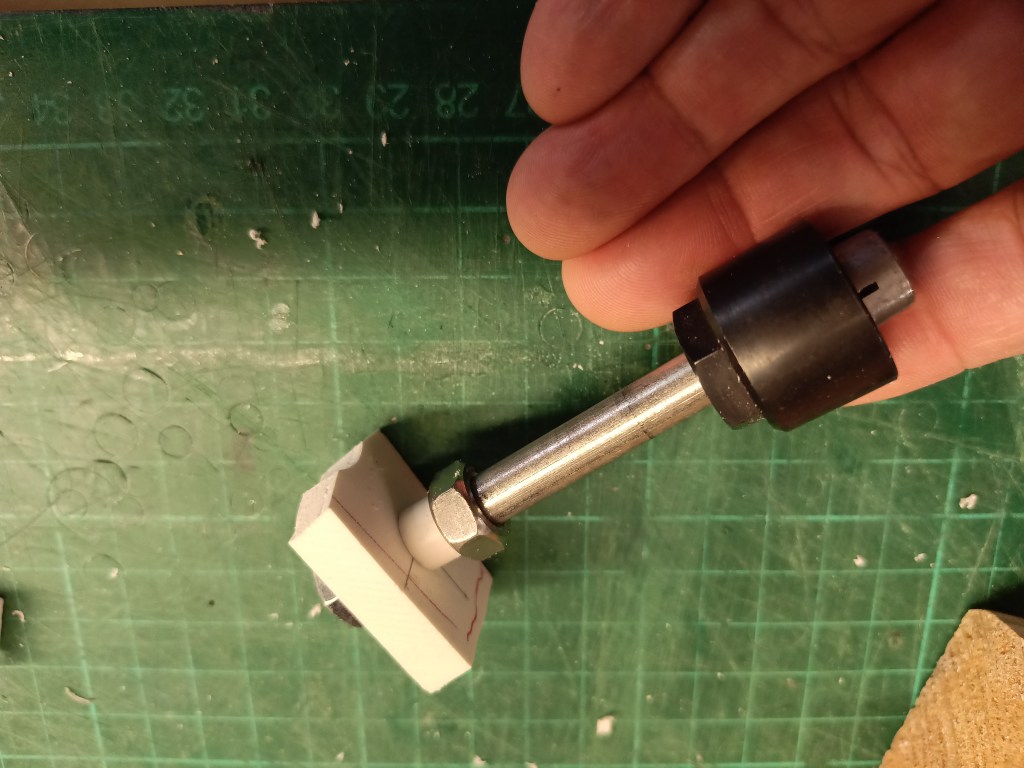
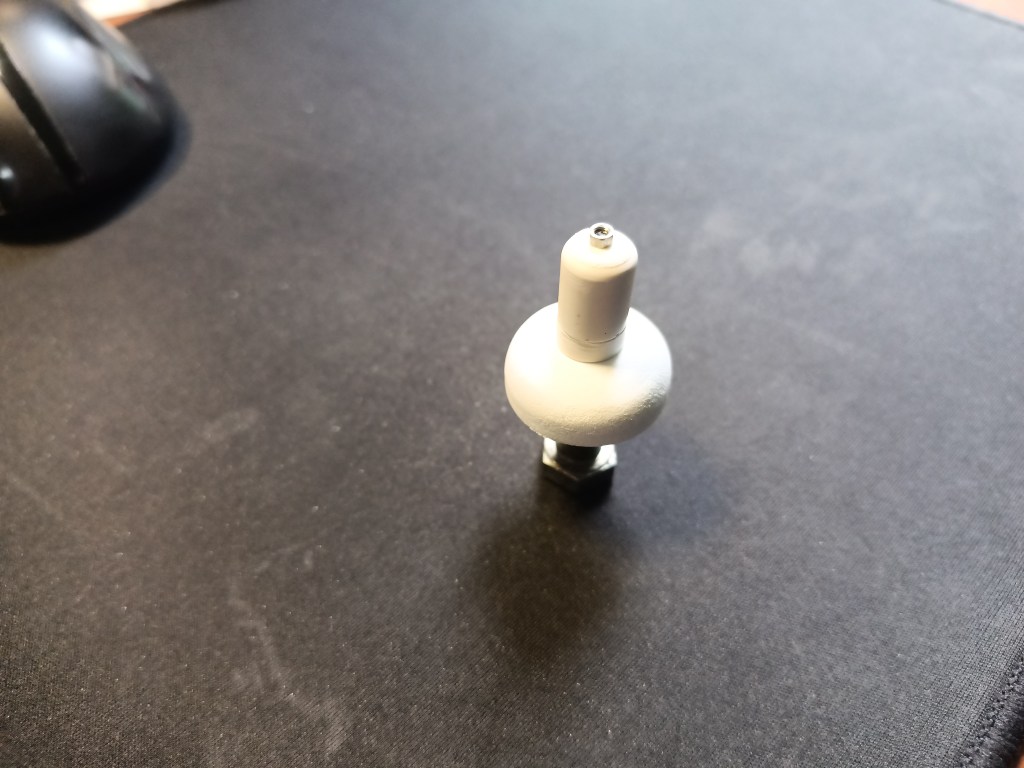
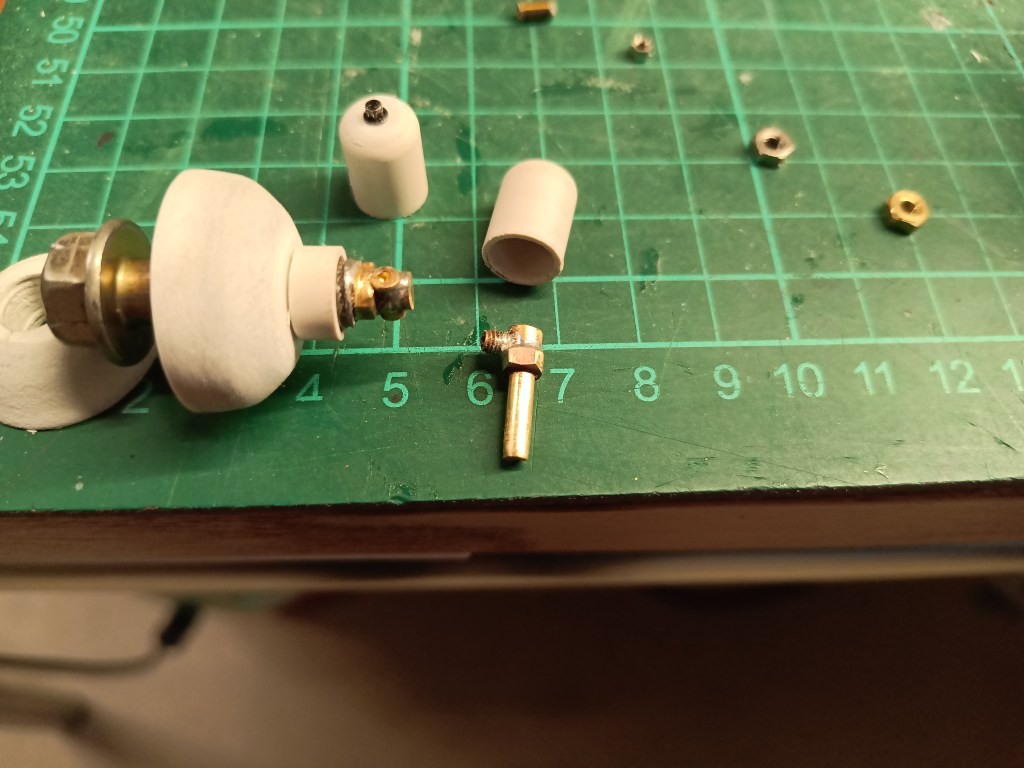
Für den oben zulaufenden Flaschenhals war wieder etwas Kreativität gefragt. Das habe ich so gelöst. Ein Forex-Reststück wurde mit 7,5 mm durchbohrt und auf eine Schraube mit Teilgewinde aufgedreht. Von unten mit einer Mutter gesichert und vorgespannt. (Links)
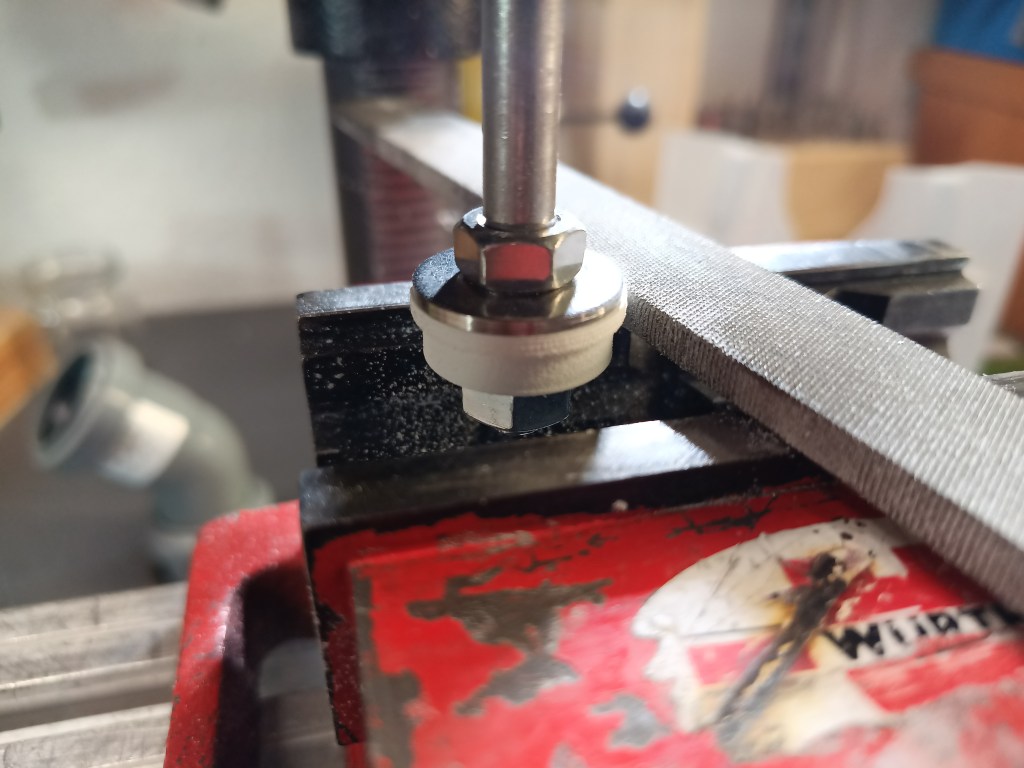
In den Fräsmotor eingespannt und auf das darunter eingespannte Rohr, für den Flaschenkörper, zentriert ausgerichtet. (Mitte)
Mit verschiedenen Schlichtfeilen das Oberteil auf den Durchmesser reduziert und dabei gleich die Rundung zum Flaschenhals geformt. Die etwas andere Drehbank des kleinen Mannes. (Rechts)
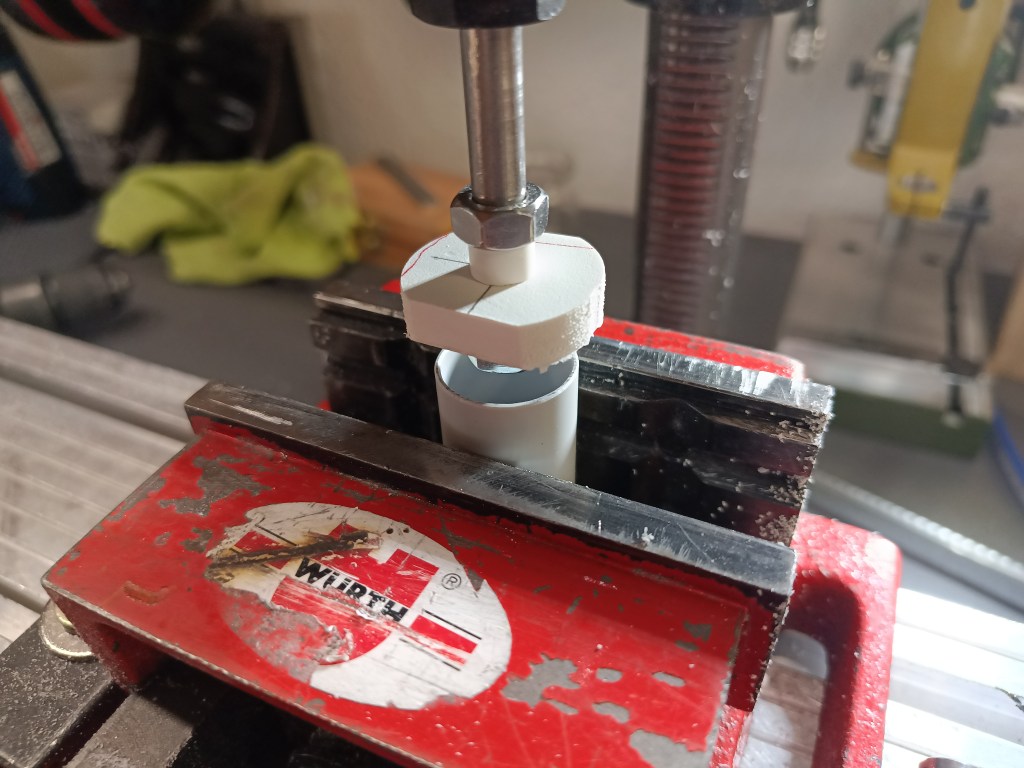
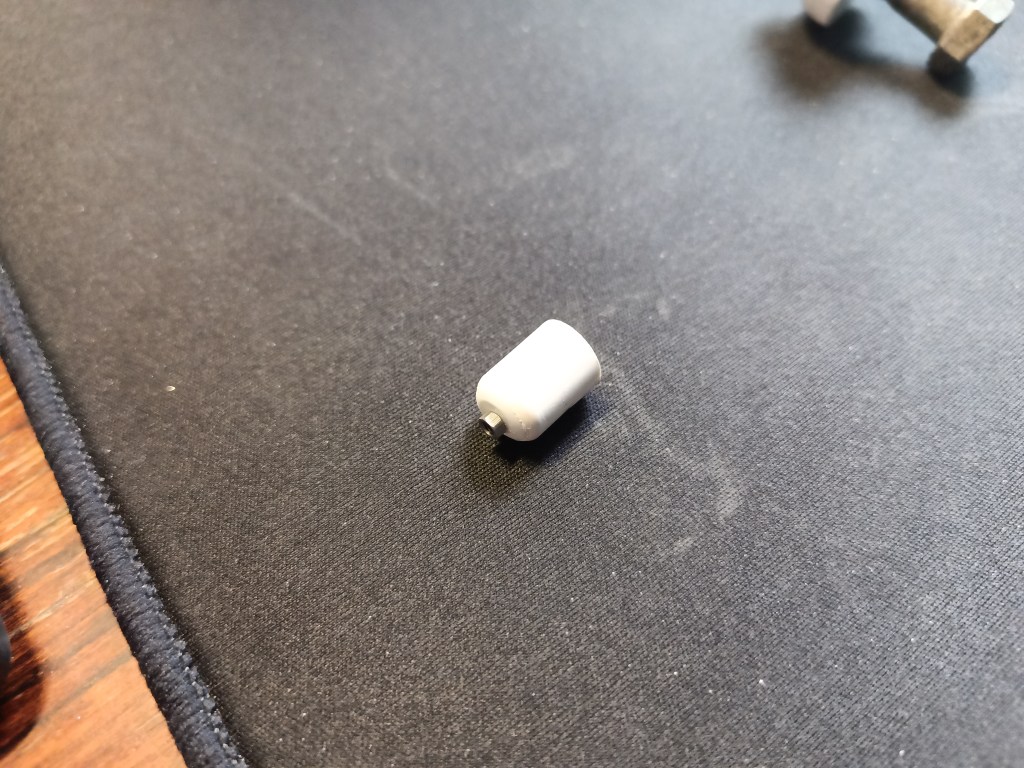
Für das Flaschengewinde wurde eine Schraube M8 von unten eingeschraubt. Das so überstehende Gewinde gibt es auch bei den Originalen. Darauf wird die Schutzkappe aufgeschraubt, um die Verschlussventile vor schädlichen Einflüssen zu schützen. Eine Sauerstoffflasche hat immerhin 200 bar Druck!
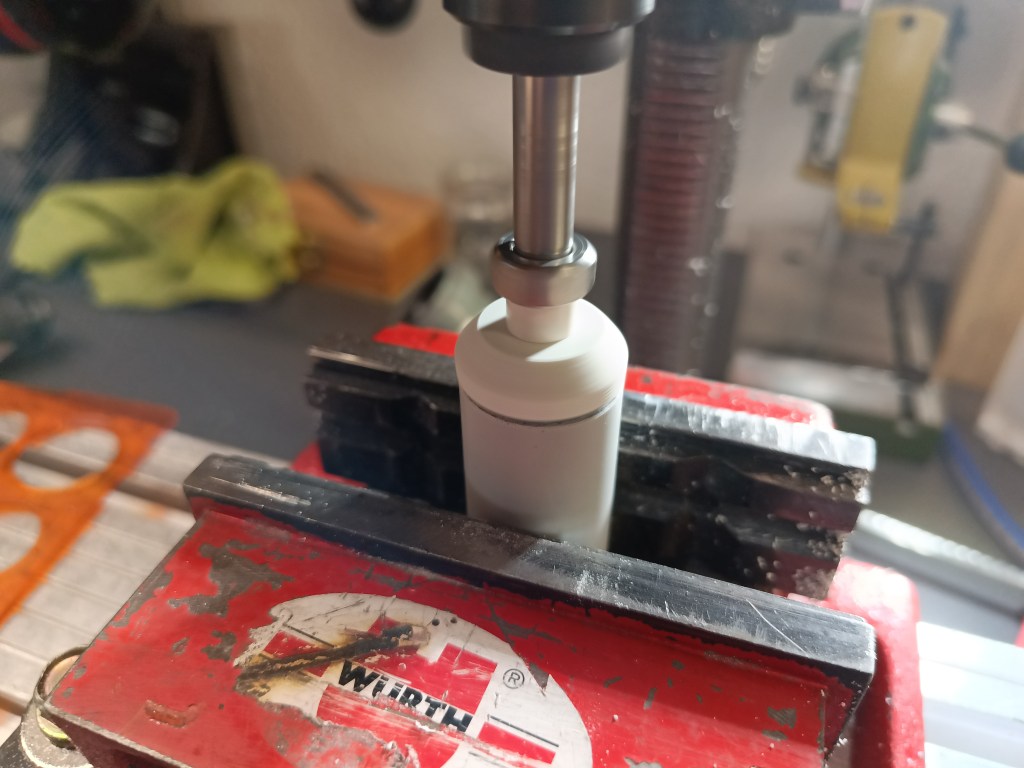
Als nächstes stand die Gestaltung der Schutzkappe an. Auch sie ist oben abgerundet. Das entstand durch einspannen in die Bohrmaschine und wurde rotierend ebenfalls mit der Schlichtfeile gerundet. Das Schleifen der Rundung war nur möglich, weil vorab 3 Lagen 1 mm PS-Scheiben in das 10 mm Kunststoffrohr eingeklebt wurden. Ein Sechskant wurden ebenfalls nach Originalvorbild verbaut. Beim Original gibts da aber glaube ich 27 mm Schlüsselweite. Da ich aber als 2,5 mm nichts mit Sechskant auf Lager hatte und wegen 2 Muttern auch nichts extra bestellen wollte, bei mir eine M2-Schraube mit Mutter und einer Schlüsselweite von 3mm.
Das bisherige Ergebnis des kompletten Flaschen-Oberteils. Hier wird es aber in jeden Fall noch eine Annäherung an das Original geben.
Passend zum oberen Abschluss auch eine ähnliche Variante am Flaschenfuß. Nach dem Abschleifen auf den passenden Außendurchmesser, wurde mit der flachen Feilenseite ein kleiner Rand herausgearbeitet. Die Kanten der Unterseite auch noch zart gerundet…
… und fertig ist der teilversenkte Flaschenboden.

Weiter geht es mit den Ventilen. Aus optischen Gründen habe ich dafür auf Messing gesetzt. In ein 4 mm Rohr wurde ein 3 mm Stab eingesetzt. Eine abgeschliffene Messingmutter, als Einschraubhilfe, kommt auf den Stab und steckt im späteren Flaschengewinde. An der Sauerstoffflasche habe ich ein 3 mm Sackloch gebohrt und darin einen M3 Gewindestummel eingelötet. Abweichend am Acetylenanschluss einen 3 mm Stab, beidseitig angebohrt. Die dazu noch zu bauenden Armaturen sehen so aus.

Meine Messingventile dazu sehen so aus.


Für die Handventile hatte ich eine Idee. Um das zu versuchen hatte ich ein Ritzel-Sortiment im Modul 0,5 bestellt. Ein sehr grobes Gewinde, dass nach meiner Bearbeitung einem Handrad nahekommen soll. Dazu wurde es um etwa die Hälfte abgeschliffen und die Kanten abgerundet.

Der Boden an beiden Flaschen ist inzwischen eingeklebt. Um oben eine saubere Rundung zu bekommen, habe ich aus Versuchsstücken des oberen Flaschenabschlusses etwas gebaut. Auf den Innendurchmesser angepasst und bündig eingeklebt. Zur optimalen Formgebung auch noch mit einem zweckentfremdeten Zeichenwerkzeug fixiert.
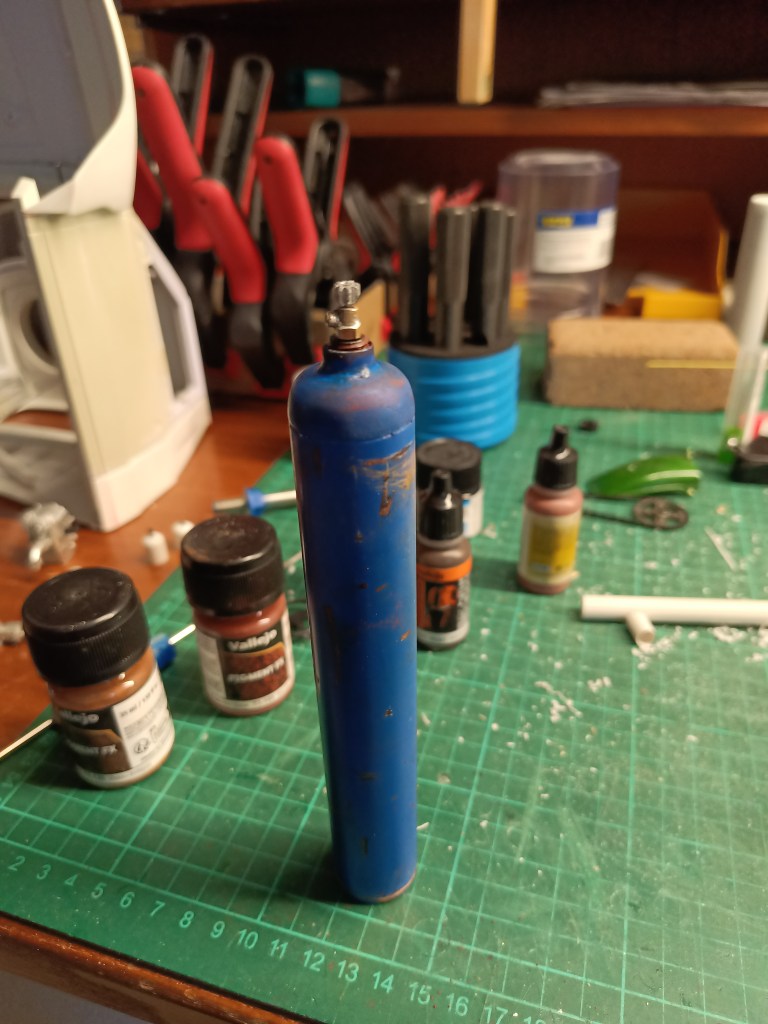
Bisher konnte ich nur den RAL-Farbton der Sauerstoffflasche mischen und aufspritzen. Mein bevorzugter Lieferant hat leider nicht die entsprechenden Farben des Herstellers Schminke auf Lager. So wurde zumindest die Sauerstoffflasche vorläufig fertiggestellt. An der oberen Verbindung von Deckel und Flaschenkörper braucht es noch mehr Spachtelmasse. Gerostet und Kratzspuren hat die Flasche auch schon, praktisch über Nacht. 😊
Wird schnellstmöglich fortgesetzt…
English Version
Production of tools and loads, part 9-Oxy-acetylene welding equipment
Every year, the so-called SuperScale takes place here in Germany. An event for RC enthusiasts to drive RC vehicles that are as realistic as possible in an equally realistic environment. This is where the distinction between real vehicles and their remote-controlled counterparts finally becomes blurred.
For the event in 2026, the RockCrawler forum called for a building competition on the theme of the Amazon. I’ve never been to this event myself, but I couldn’t turn down a request to take part in the competition. The participating models will then become part of the SuperScale organization and will enrich future events. In the run-up to each event, this volunteer organization has a lot of work and sacrifices free time. I liked the idea of making a small contribution.
A typical Amazonian piece can be built on an area of 60×60 cm. Houses, boats, rafts and whatever else comes to mind. My competition entry is a wooden hut made of logs and boards with a corrugated iron roof. I’ll be presenting the building shortly once I’ve started on it. At the moment I’m collecting logs and ideas.
Now to the topic. The building will become the site of the Rat Comanche. Life is to be depicted in and around the building. Improvisation and the re-use of used parts should be in the foreground. Today I am building a welding facility with one gas cylinder and one acetylene cylinder. I will present the fittings in the following posts.
Fuel gases and oxygen are available in different sizes and capacities. Here there are two 50 liter cylinders. The largest quantity ever available in cylinders for oxy-fuel fusion welding. The original dimensions for oxygen, 229 mm diameter and 1645 mm height. Acetylene 230 mm and 1460 mm. The competition models are to be built on a scale of 1:10. For reasons of simplicity and availability, I used ready-made 24 mm plastic tubing for the cylinder body, slightly larger than required. It is normally used as a protective tube for surface-mounted cable installations.
A little creativity was again required for the neck of the bottle, which tapers at the top. This is how I solved it. I drilled a 7.5 mm hole in a leftover piece of forex and screwed it onto a partially threaded screw. Secured from below with a nut and pre-tensioned. (Left)
Clamped into the milling motor and centered on the tube clamped underneath for the bottle body. (Center)
Reduced the upper part to the diameter with various finishing files and at the same time formed the curve to the neck of the bottle. The little man’s somewhat different lathe. (Right)
An M8 screw was screwed in from below for the bottle thread. The protruding thread is also found on the originals. The protective cap is screwed onto it to protect the sealing valves from harmful influences. After all, an oxygen cylinder has a pressure of 200 bar!
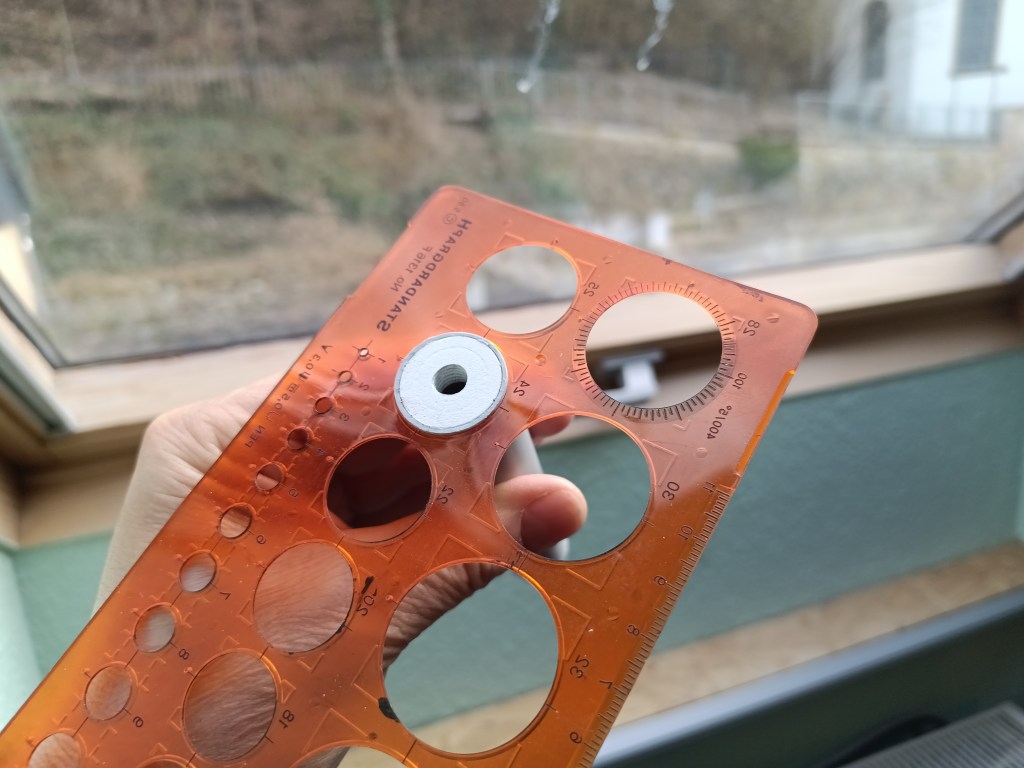
The next step was to design the protective cap. It is also rounded at the top. This was created by clamping it in the drilling machine and was also rounded in rotation with the finishing file. The rounding was only possible because 3 layers of 1 mm PS washers were glued into the 10 mm plastic tube in advance. A hexagon was also installed according to the original. However, I think the original has a 24 mm width across flats. However, as I had nothing in stock with a 2.5 mm hexagon and didn’t want to order anything extra because of the 2 nuts, I used an M2 screw with nut and a wrench size of 3 mm.
The result so far of the complete upper part of the bottle. However, there will definitely be an approximation to the original here.
A similar variant on the base of the bottle to match the top finish. After sanding down to the appropriate outer diameter, a small edge was worked out with the flat side of the file. The edges of the underside were also delicately rounded…
… and the partially recessed bottle base is finished.
I continue with the valves. For visual reasons, I opted for brass. A 3 mm rod was inserted into a 4 mm tube. A ground brass nut, as a screw-in aid, is placed on the rod and inserted into the later bottle thread. I drilled a 3 mm blind hole in the oxygen cylinder and soldered an M3 threaded stub into it. Alternatively, I drilled a 3 mm rod on both sides of the acetylene connection. The fittings still to be built look like this.
My brass valves look like this.
I had an idea for the manual valves. To try this, I ordered a pinion assortment in module 0.5. A very coarse thread that, after machining, should resemble a handwheel. To do this, it was ground down by about half and the edges rounded off.
The base of both bottles has now been glued in. To get a clean rounding at the top, I built something from test pieces of the upper bottle end. Adjusted to the inside diameter and glued in flush. I also fixed it with a misused drawing tool to give it the perfect shape.
So far I have only been able to mix and spray the RAL color of the oxygen bottle. Unfortunately, my preferred supplier does not have the corresponding colors from the manufacturer Schminke in stock. So at least the oxygen bottle was finished for the time being. The upper connection between the lid and the bottle body needs more filler. The bottle has already rusted and scratched, practically overnight. 😊
Will be continued as soon as possible…
Translation, with the kind support of deepl.com
