Quellen: Graupner
English Version
An einem wunderschönen Tag die Fernsteuerung einzusetzen, ist etwas für die Seele und das eigene Wohlbefinden. Was sich dabei am anderen Ende, mittels Empfänger in Bewegung setzen lässt, ist sehr vielfältig. Meine zweite Leidenschaft gehörte dabei auch dem Schiffsbau. Das nicht im gleichen Umfang wie die Fortbewegung auf vier Rädern, aber etwas was mir immer noch große Freude bereitete. So habe ich vor einigen Wochen ein seit mehr als 30 Jahren ruhendes, altes Fortbewegungsmittel wieder hervorgeholt. Damals aufgebaut, wenig benutzt und wieder geparkt. Ein Anfängermodell des deutschen Herstellers Graupner. Unter dem Namen Marina wurde sie wohl Mitte-Ende der 80er Jahre von mir gekauft.
Die technischen Daten des Baukastenmodells im Maßstab 1:17 aus der Original-Bauanleitung:
- Länge ja nach Bauweise 490-535 mm*
- Breite 182 mm
- Höhe je nach Bauweise 310-365 mm*
- Tiefgang 30 mm
- Gewicht und Wasserverdrängung, voll aufgerüstet ca. 1,75 kg
- Geschwindigkeit ca. 4,1 km/h
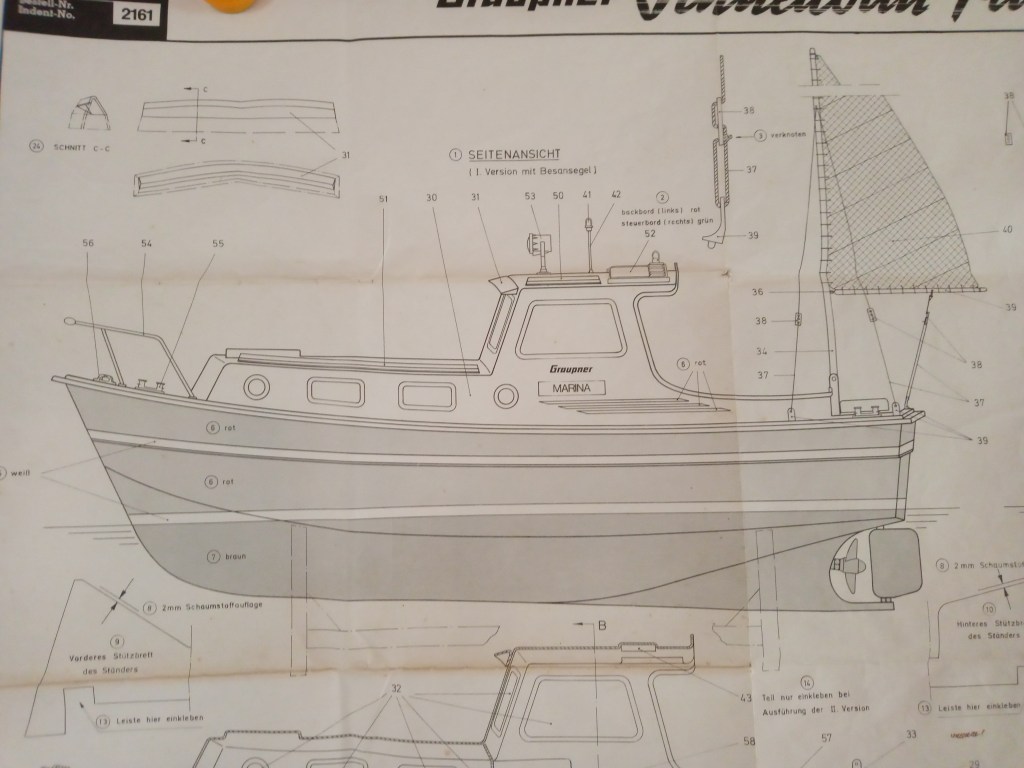
* Bauweise in Höhe und Länge variabel, weil die Montage eines optionalen Besansegels am Heck möglich war.
Hier ein Auszug aus dem Bauplan, mit montiertem Besansegel.
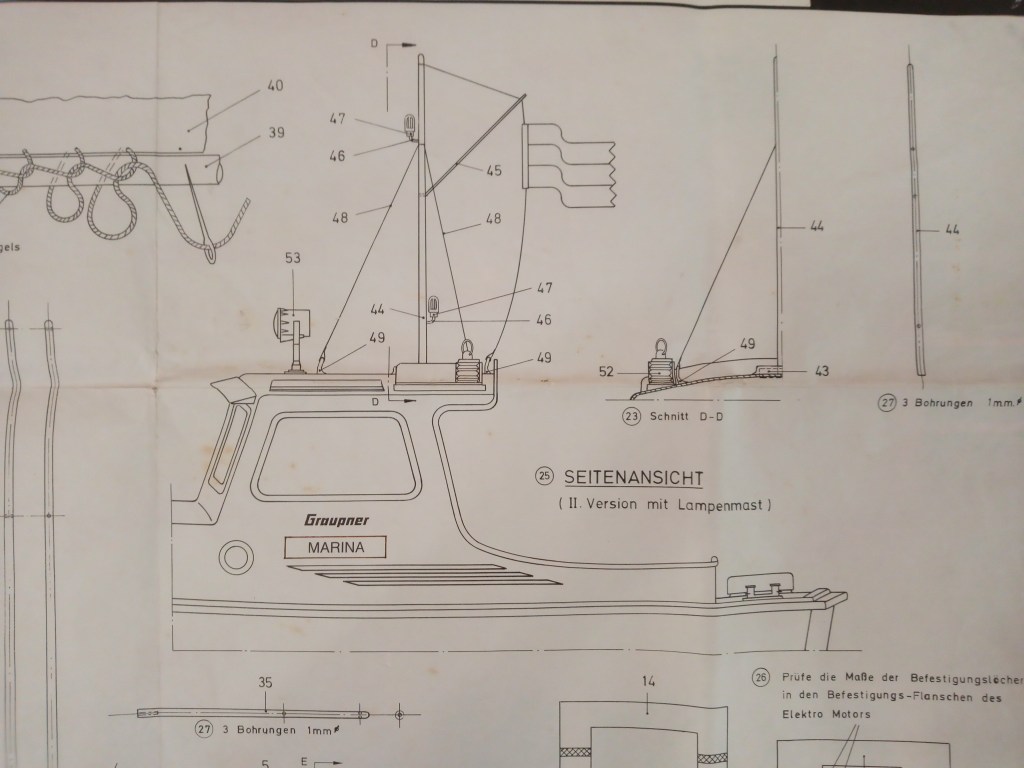
Ich hatte mich für den Bau der zweiten Variante, mit einem Lampenmast entschieden. Mein erster Versuch mit einem Segelboot, endete in einem Fiasko. Nicht etwa Schuld des Bootes, sondern des Kapitäns. Segeln ohne die nötigen Vorkenntnisse ist keine gute Idee.
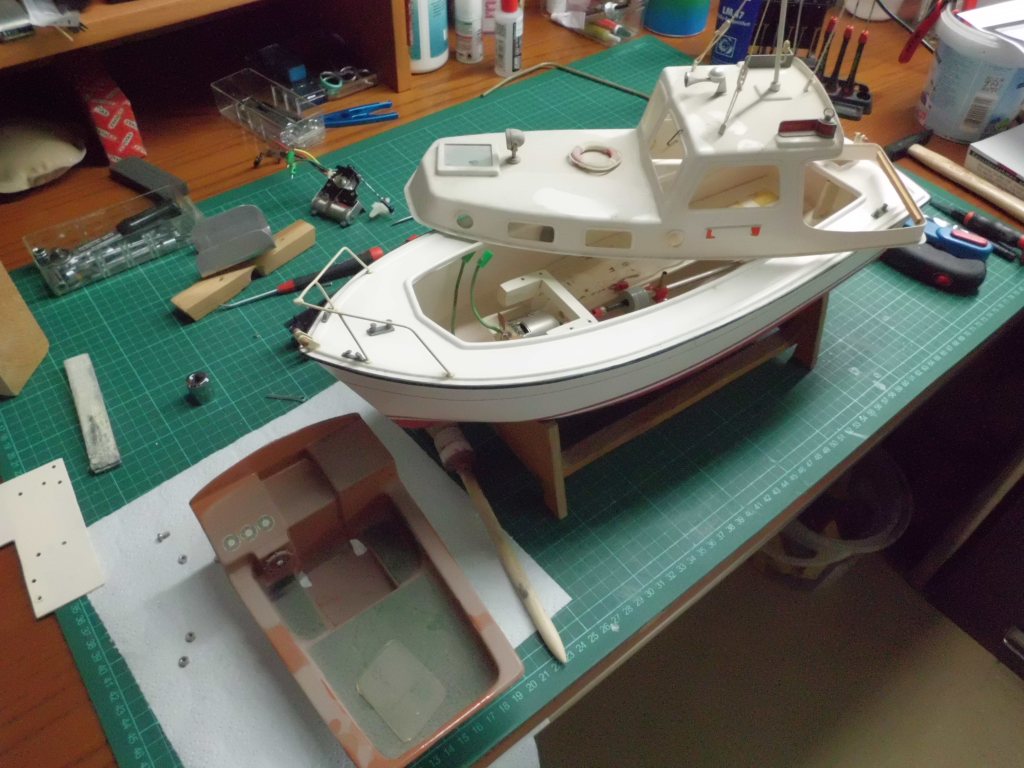
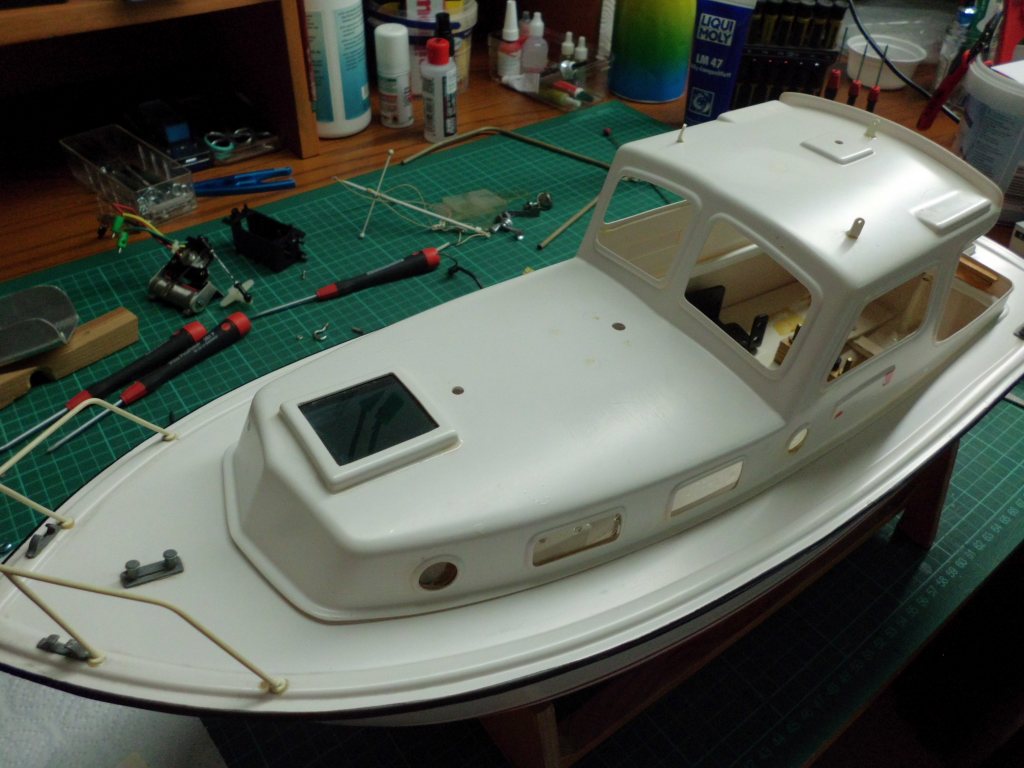
Die Ansicht vor Baubeginn, stark eingestaubt, einiger Teile beraubt und zudem mit einigen Defekten (u.a. vordere Reling gebrochen und einige Fensterelemente fehlen)
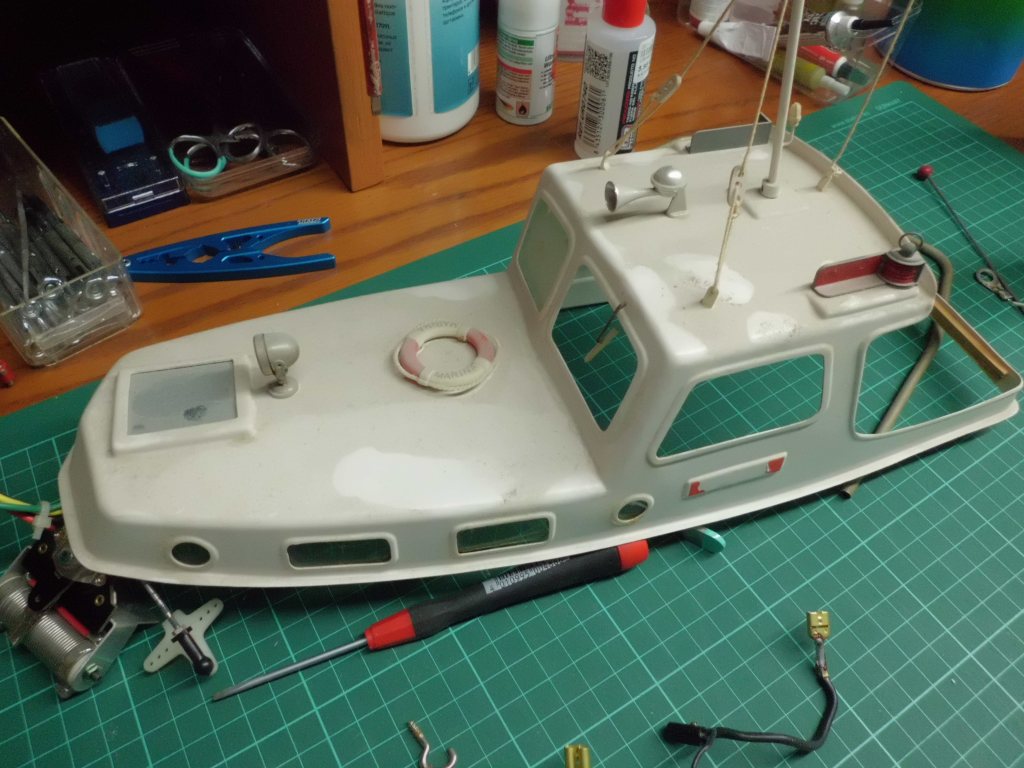
Nun zum Plan der anstehenden Restauration. Das damalige Anfängermodell und gleichzeitige Schnellbaukasten, sollte grundlegend überarbeitet werden. Dazu gehören eine komplette und funktionsfähige Lichtanlage, ein komplett neuer Mast, Metall-Reling am Bug, Messingbullaugen mit echten Schrauben befestigt, Handläufe auf dem Kabinendach, ein neuer Fahrstand und eine Plattform am Bootsheck. Das Bootsdeck soll eine Holzbeplankung erhalten und der Freisitz hinter dem Fahrstand eine elegantere Sitzgelegenheit bekommen. Als Antrieb wird der ehemalige mechanische Fahrtregler durch ein aktuelles elektronisches Modell ersetzt. Der Antriebsakku muss ebenfalls erneuert werden. Als Abschluss wird eine vollständige 2-Farben-Lackierung die Restauration abrunden.
Zunächst wurde das komplette Schiff werftmäßig abgerüstet und gereinigt.
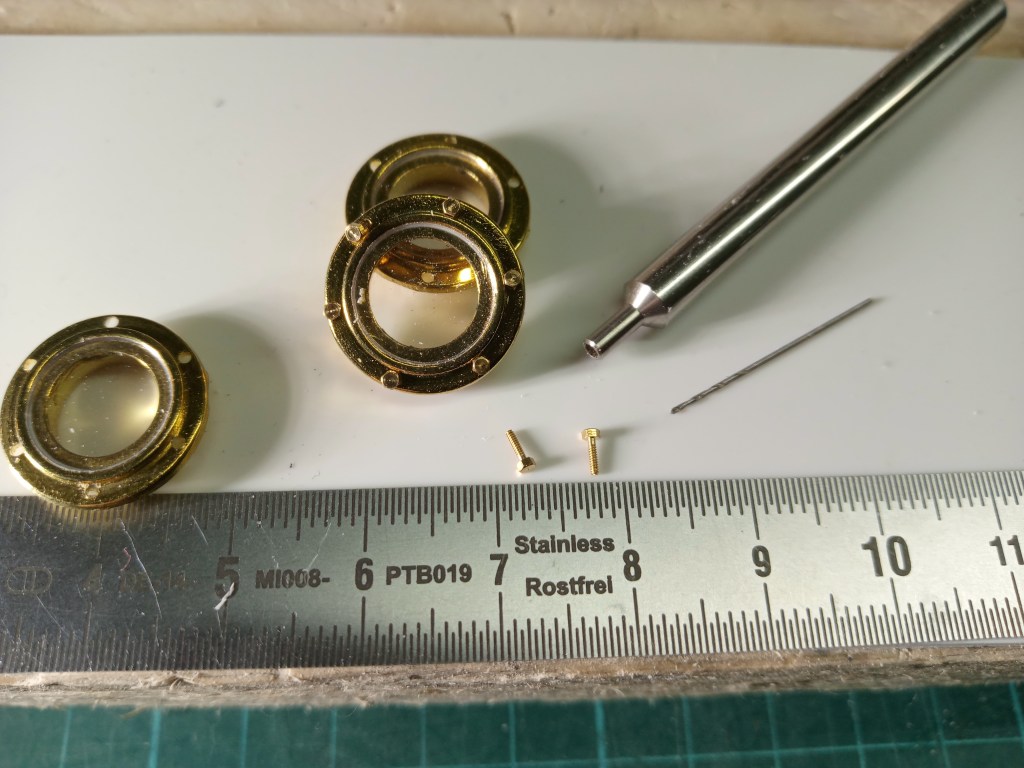
Die ersten Arbeiten galten den Messing-Bullaugen. Sie haben sechs 0,9 mm kleine Bohrungen am Befestigungsflansch.
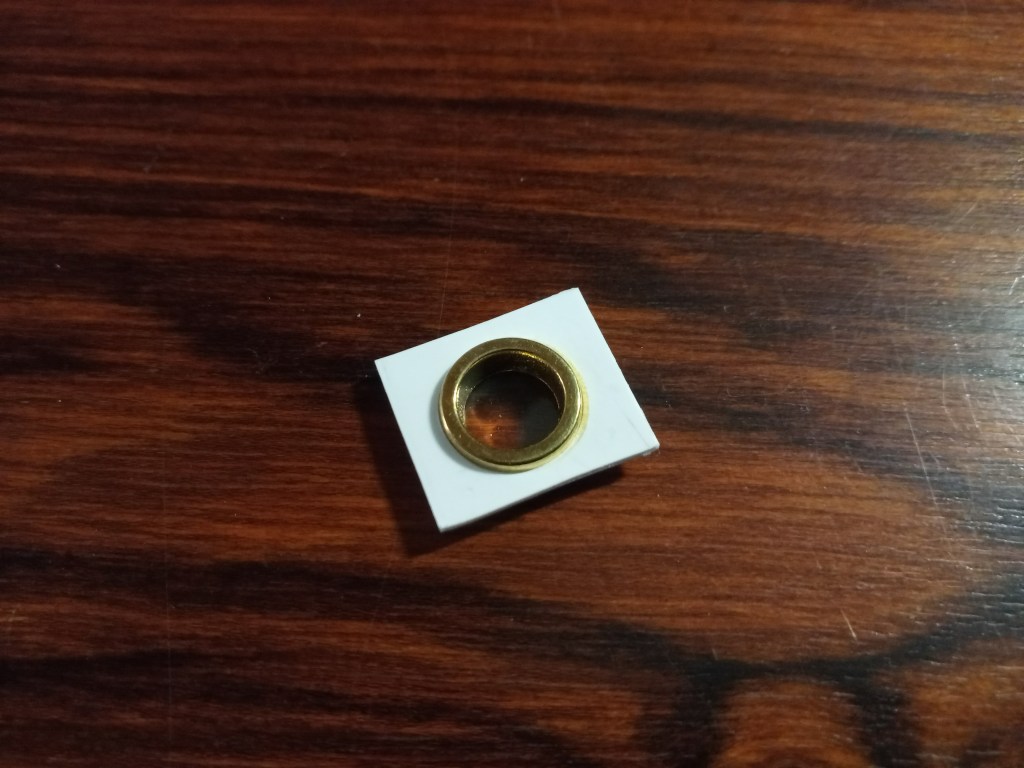
Um eine optische Kontur zu realisieren, hatte Graupner die Kabinenwand im Bereich der Fenster hervorgehoben geprägt. Da in der Schräge keine Schrauben halten, hatte ich die Öffnungen zunächst aufgespindelt. So gäbe es aber keine Befestigungsmöglichkeiten mehr, für die Schrauben.

So musste ich noch kleine PS-Stücke mit entsprechender Bohrung für die Bullaugen herstellen, die auf der Kabinen-Innenseite verklebt wurden.

Eigens beschaffte Werkzeuge für die Messing-Gewindeschrauben und Muttern in der Dimension M 0,6. Der Wahnsinn hat nun einen Namen und auch ein Bild.
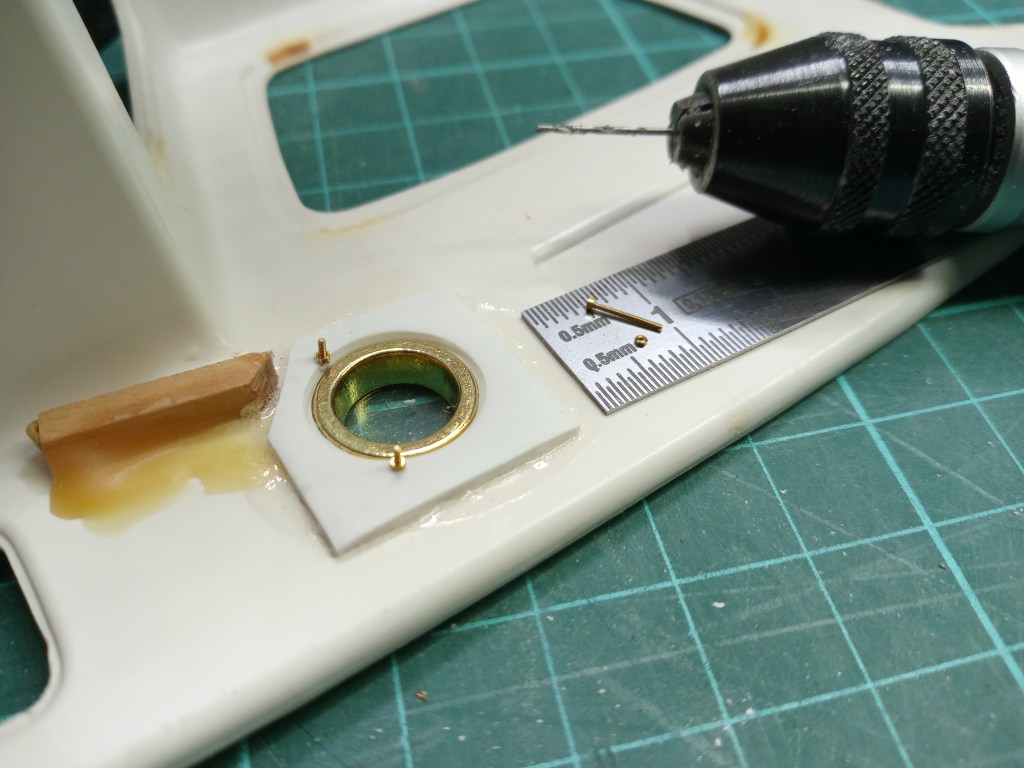
Das nun sechs Mal pro Bullauge und bei gleich vier Bullaugen, allerdings erst nach der Lackierung …
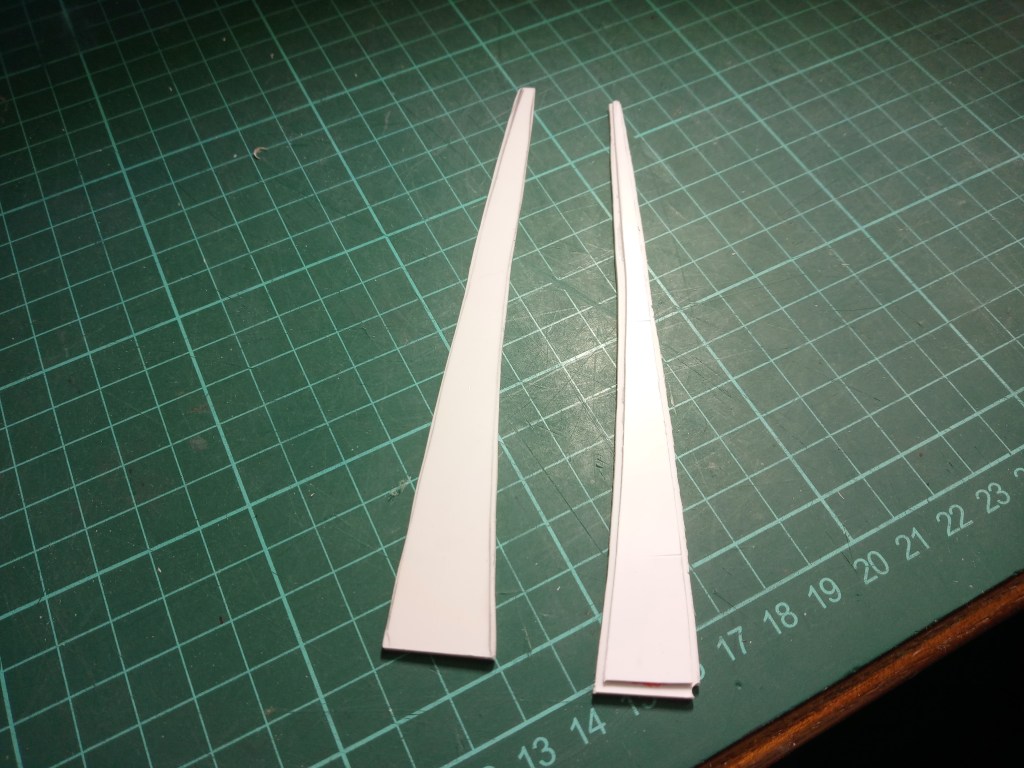
Für den nächsten Bauschritt wurden wieder einige PS-Reste verarbeitet. Der neue Mast wurde aus drei Lagen Polystyrol verklebt. Die mittlere etwas kleiner, als die beiden äußeren Teile.
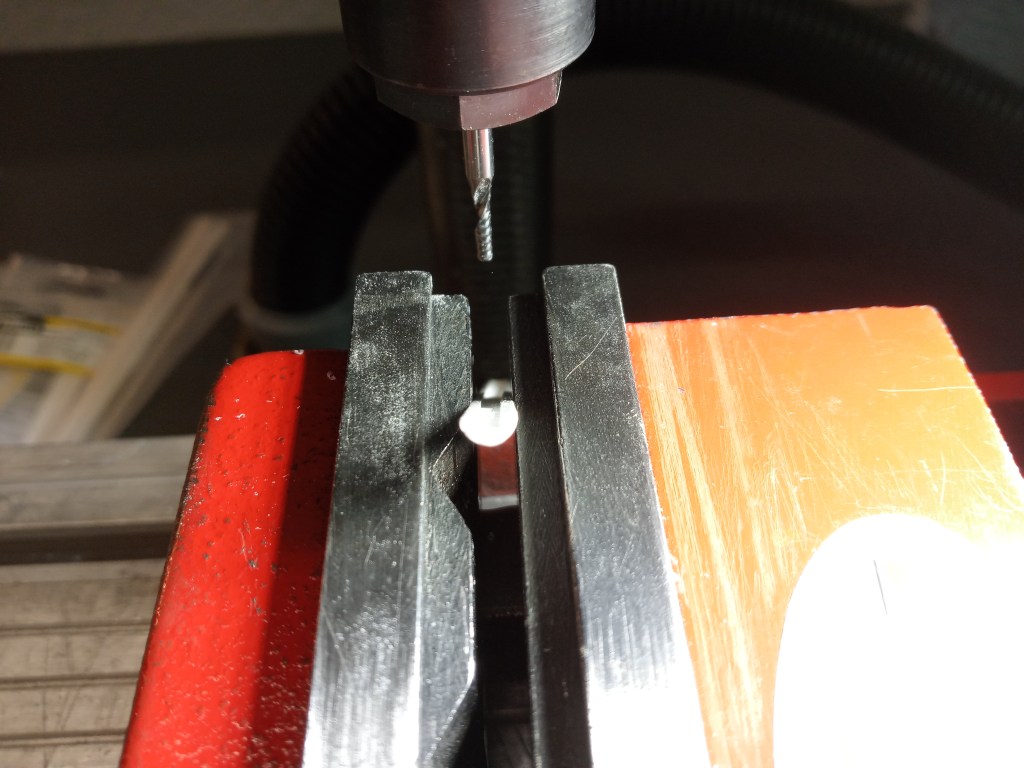
Jeweils ein vorderer und hinterer Abschluss, sollte die Kontur des Mastes abrunden. In die wurden nun noch eine Kontur in das 4,5 mm schmale Halbrundprofil gefräst.
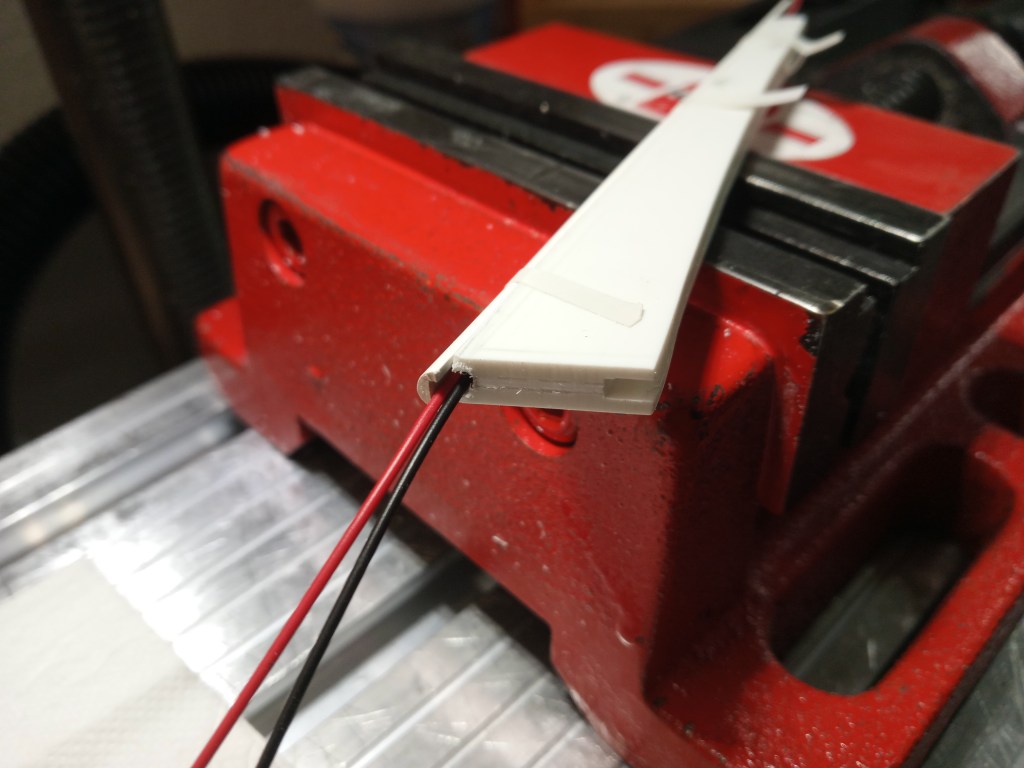
Mit dem Ergebnis, dass vorne und hinten ein Kabelkanal entstanden ist, um später die beiden Positionslichter zu beleuchten.
Nach einigen Änderungen an der Masthöhe und dem ersten Feinschliff, dass vorläufige Ergebnis.
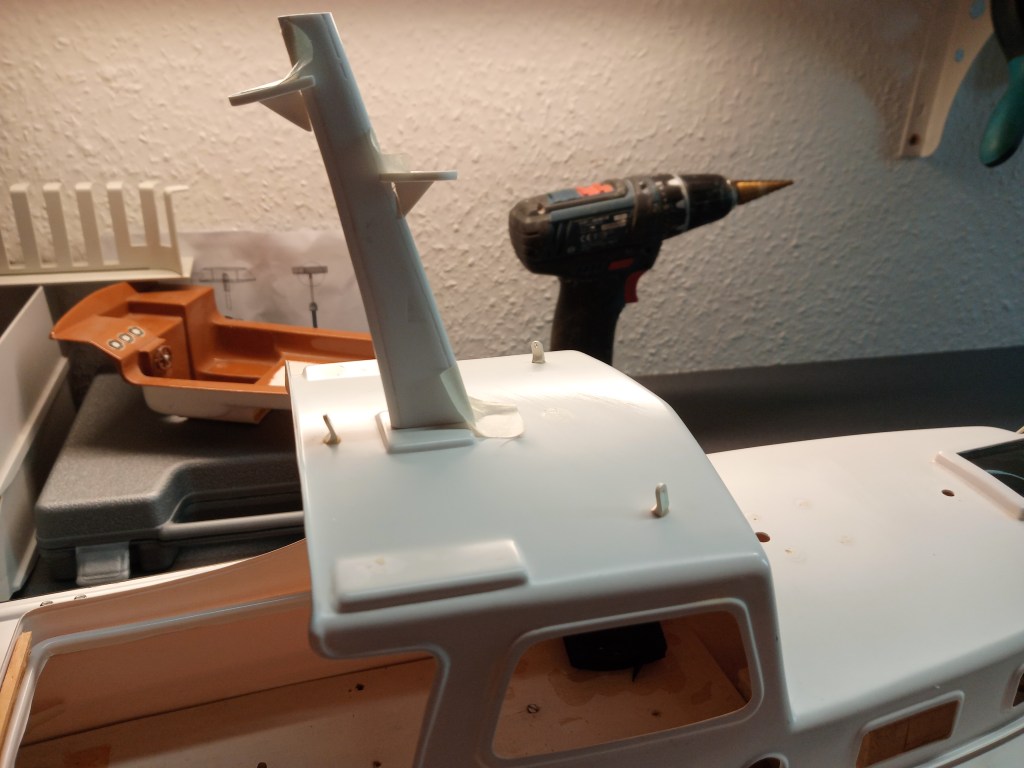
Im Endausbau wird zusätzlich zu den beiden vorne und hinten angebrachten Positionslichtern, ein Radom und eine Antenne den Mast schmücken. Dabei plane ich den Mast mit einem Magneten auf dem Dach zu fixieren, damit er bei zukünftigen Transporten keinen Schaden nimmt.
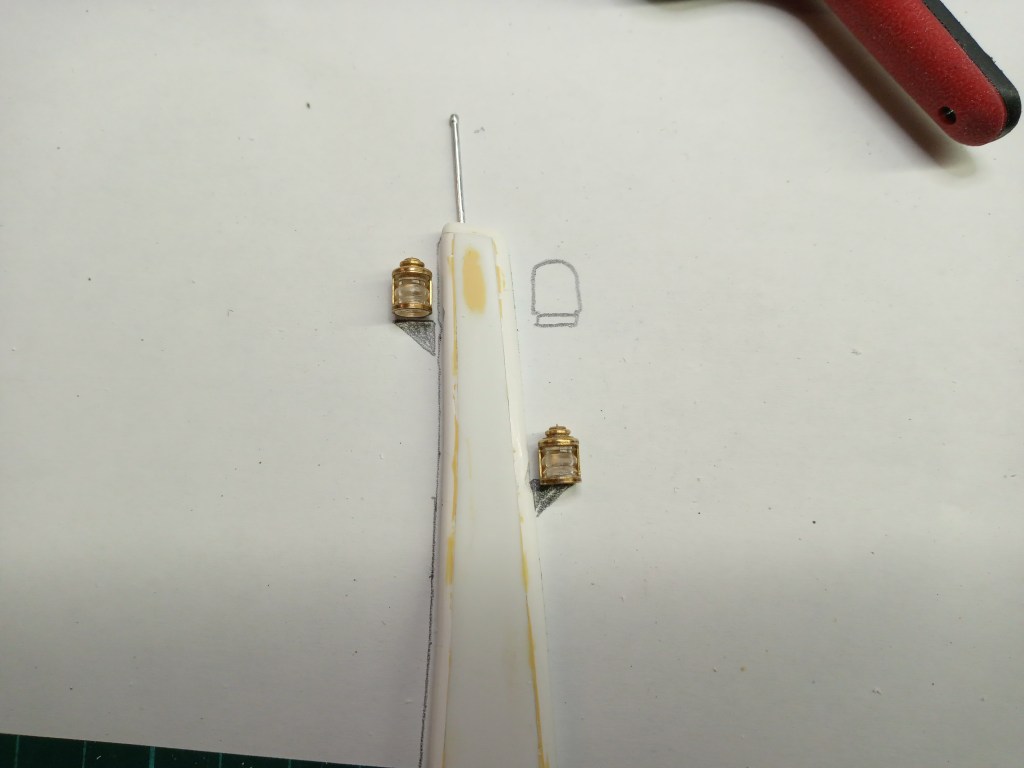
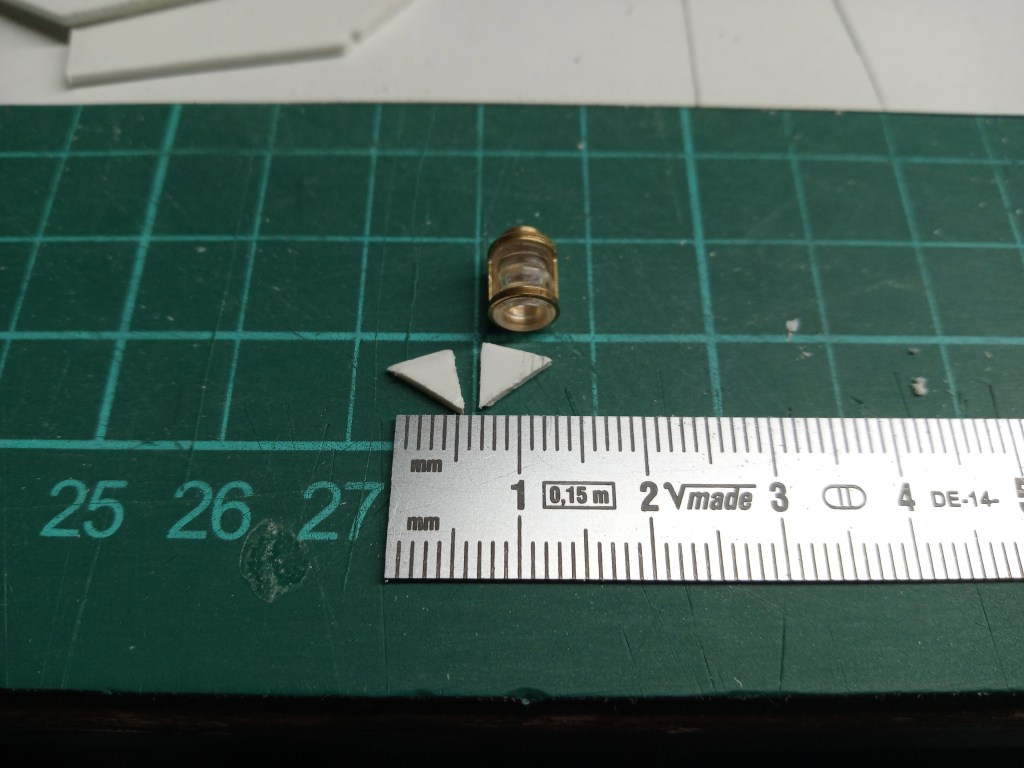
Meine derzeitige Herausforderung ist die Konsole für die Positionslichter. Das nachfolgende Bild, zeigt die dabei vorhandenen Größenverhältnisse. Im Positionslicht werden noch Micro-SMD-LEDs verbaut. Die entsprechende Lieferung der Fa. Bauer-Modelle aus Wendlingen steht dazu noch aus. Das Ziel ist in jedem Fall eine unsichtbare Verlegung der Kabel, vom Mast bis zum Positionslicht. Der bisher eingeschlagene Weg muss aber noch einmal überdacht werden. Eine Realisierung nach folgender Ausführung wird wohl nicht möglich sein. Zum Verkleben und Fixieren ist einfach alles zu klein. Ich habe aber weitere Ideen…
Wird schnellstmöglich fortgesetzt…
English Version
Slow and not landbound
Sources: Graupner
Using the remote control on a beautiful day is something for the soul and your own well-being. What can be set in motion at the other end, by means of a receiver, is very diverse. My second passion also belonged to shipbuilding. Not to the same extent as the locomotion on four wheels, but something that still gave me great pleasure. So a few weeks ago I brought out again an old means of transport that had been dormant for more than 30 years. Built up then, little used and parked again. A beginner model of the German manufacturer Graupner. Under the name Marina, it was probably bought by me in the mid-late 80s.
The technical data of the kit model in scale 1:17 from the original building instructions:
- Length yes according to construction 490-535 mm*.
- width 182 mm
- height according to construction 310-365 mm*
- Draft 30 mm
- Weight and water displacement, fully rigged approx. 1.75 kg
- Speed approx. 4.1 km/h
* Construction method variable in height and length, because the mounting of an optional mizzen sail at the stern was possible.
Here an excerpt from the construction plan, with mounted mizzen sail.
I had decided to build the second variant, with a lamp post. My first attempt with a sailboat ended in a fiasco. Not the fault of the boat, but of the captain. Sailing without the necessary previous knowledge is not a good idea.
The view before the start of construction, very dusty, robbed of some parts and also with some defects (e.g. front railing broken and some window elements missing)
Now to the plan of the upcoming restoration. The then beginner’s model and at the same time quick-build kit, should be fundamentally reworked. This includes a complete and functional light system, a completely new mast, metal railings on the bow, brass portholes fixed with real screws, handrails on the cabin roof, a new driving position and a platform at the boat stern. The boat deck is to receive wood planking and the outdoor seating behind the driver’s station will receive more elegant seating. For propulsion, the former mechanical speed controller will be replaced with a current electronic model. The drive battery will also have to be replaced. As a final touch, a complete 2-color paint job will complete the restoration.
First, the complete ship was stripped and cleaned in the shipyard.
The first work was on the brass portholes. They have six 0.9 mm small holes on the mounting flange.
To create an optical contour, Graupner had embossed the cabin wall in the area of the windows. Since no screws hold in the slope, I had initially spindled open the openings. But this way, there would be no more fastening possibilities for the screws.
So I had to make small PS pieces with corresponding holes for the portholes, which were glued to the inside of the cabin.
Specially procured tools for the brass threaded screws and nuts in the dimension M 0.6. The madness now has a name and also a picture.
Now six times per porthole and four portholes, but only after painting …
For the next construction step, some leftover horsepower was used again. The new mast was glued from three layers of polystyrene. The middle one is a bit smaller than the two outer parts.
A front and a rear end should round off the contour of the mast. A contour was milled into the 4.5 mm narrow semicircular profile.
As a result, a cable duct was created at the front and rear to later illuminate the two position lights.
After some changes to the mast height and the first fine tuning, the preliminary result.
In addition to the two position lights at the front and rear, a radome and an antenna will decorate the mast. I plan to fix the mast with a magnet on the roof, so that it will not be damaged during future transports.
My current challenge is the console for the position lights. The following picture shows the proportions. Micro-SMD-LEDs are still installed in the position light. The corresponding delivery from Bauer-Modelle in Wendlingen is still pending. In any case, the goal is to lay the cables invisibly, from the mast to the position light. However, the path taken so far will have to be reconsidered. A realization according to the following design will probably not be possible. For gluing and fixing everything is simply too small. But I have further ideas…
Will be continued as soon as possible…
Translation, with the kind support of deepl.com
